
::: tip Prerequisites
To follow along with this tutorial, you will need to register with Speckle and install the required connectors 🔌. It takes less than 3 minutes!
For a comprehensive overview of this connector, check our docs 📚!
:::
The Dynamo Connector
Our Dynamo Connector takes the form of a node package, which is installed via the Speckle Manager. To install the Dynamo Connector and add your Speckle account, follow the instructions in our Speckle Manager docs section.

Once installed, the Dynamo Connector will appear as a node package in your library as Speckle 2.
The Speckle 2 package contains the main nodes necessary to use Speckle within Dynamo, including nodes for sending and receiving data, managing streams and selecting accounts.
We've also built a few nodes for more advanced use cases, as well as some handy tools for Speckle developers/hackers (these are found in the Developer Tools sub-section of the package).
Streams and URLs
Speckle Streams are identified by their URLs. Across our Dynamo and Grasshopper connectors you'll see URLs in 3 different formats:
https://speckle.xyz/streams/3073b96e86points to themainbranch on Stream3073b96e86https://speckle.xyz/streams/3073b96e86/branches/devpoints to a branch nameddevon Stream3073b96e86https://speckle.xyz/streams/3073b96e86/commits/604bea8cc6points to a specific commit604bea8cc6on Stream3073b96e86https://speckle.xyz/streams/3073b96e86/objects/df7b8bafccefa791d82939dd36541189points to a specific objectdf7b8bafccefa791d82939dd36541189on Stream3073b96e86
::: tip
Unsure about what commits and branches are? No worries, you don't need to know what they are to use Speckle! But if you're curious, you can read about them in Core Concepts.
:::
We'll see how branch and commit URLs are used in the following sections.
Sending Data
Let's look at how we would send some data in Dynamo. First, start by creating a new Send Data node.

In order to select which stream to send data to, you just need to pass a stream URL to the streamUrl port.
Alternatively, you can also use one of the following nodes to create / retrieve existing streams:
NOTE
You cannot send data to a specific commit. Commits are a snapshot of data at a specific point in time and therefore cannot be edited.
Adding Objects
In order to select which objects to should be sent to your stream, you just need to connect the desired data to the data input in the Send Data node. The node will automatically convert any supported Dynamo objects into a Speckle-compatible format.
Adding a Commit Message
Although optional, it's considered good practice to add a "commit message" whenever you send you data (especially if working with others). This message should describe the changes being pushed. You can add a commit message by passing any string to the message port. The commit message will be visible in the Speckle Web App (where you will also be able to edit it).
Sending Data
With a Stream URL and some data to send, the only thing left to do is to press the Send button. This will begin the process of translating your data to Speckle's object model and uploading it to your Speckle server.
Viewing a Stream Online
To view the sent stream online you can just right click on the sender node:

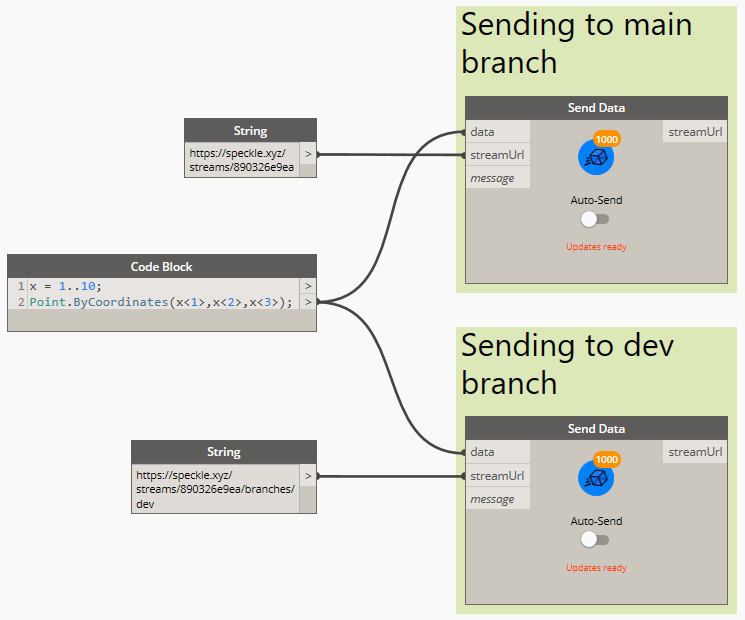
Sending to a Specific Branch
When using a stream URL, by default, the main branch is used to send and receive data.
To send to a specific branch, simply use the branch URL, such as: https://speckle.xyz/streams/3073b96e86/branches/dev.
Receiving Data
Receiving data is very simple, you just need a Receive Data node, and a stream URL.
When new data is pushed to this stream a notification will appear on the receive node.
Auto Receiving
By using the toggle on the node, you can enable/disable auto receiving. If enabled, new data pushed to this stream will be pulled automatically as it's available.
Receiving a Specific Branch
When using a stream URL, the main branch is used to send and receive data by default.
You can also receive data from a specific branch; simply use the branch URL, such as: https://speckle.xyz/streams/3073b96e86/branches/dev.
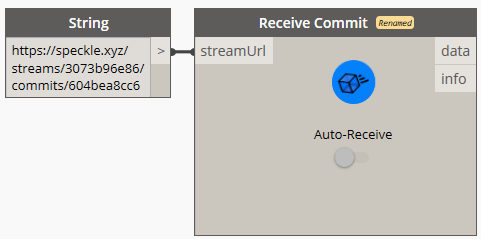
Receiving a Specific Commit
We've already seen how to retrieve data from streams and branches. It's possible to go even deeper, retrieving data from specific commits. To do this, simply use the commit URL, such as: https://speckle.xyz/streams/3073b96e86/commits/604bea8cc6
::: tip Note
When receiving from a commit, the node will stop showing notifications about new activity and the auto-receive toggle will be disabled. This is because commits cannot be edited.
:::
Receiving a Specific Object
Similarly to commits, you can also point the receive node to a specific object. To do this, simply use the object's URL, such as: https://speckle.xyz/streams/3073b96e86/objects/df7b8bafccefa791d82939dd36541189.
Like commits, objects in a commit cannot be edited, so the data received using such a URL will always be consistent. You can find the ID of an object from the Speckle Web interface:

Viewing a Stream Online
To view the received stream online you can just right-click on the receiver node:
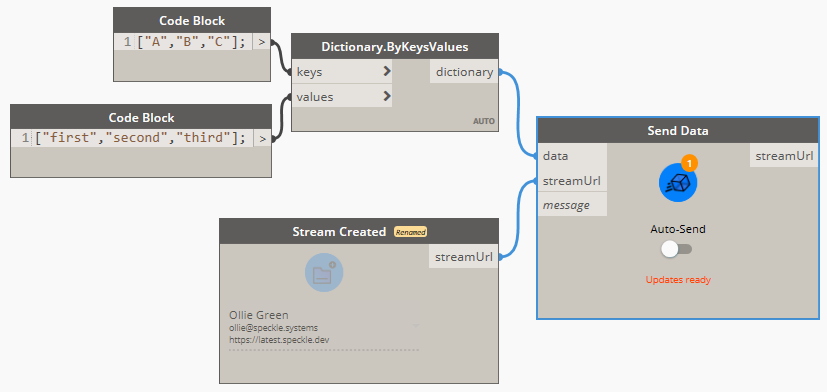
Creating Custom Objects
A Custom Object is a Base Object with custom properties assigned to it. It's basically a custom data structure you can create to send data in a specific format that you define.
In Dynamo, we use dictionaries to represent custom objects since they are natively supported, so creating custom objects is as simple as creating a dictionary containing the keys and values you wish to include in the Base object.
This dictionary will be automatically converted to a Base object during the Send operation.
::: tip
Learn more about the Speckle Base object here 👈
:::
Conclusion
We hope you enjoyed this tutorial and found it useful!
Speckle is an Open Source project and we really ❤️ feedback, so if you have any questions, comments, critiques, or praises please let us know on our community forum.