

This tutorial provides a detailed breakdown of the code used to create an AI agent for Speckle Real-Time Commenting. The agent uses Langchain and OpenAI's GPT-3.5-turbo model to understand natural language queries, fetch and process data from the Speckle server, and generate meaningful responses. The document also highlights some limitations of the agent and celebrates its potential to transform the way we work with unlocked BIM data.
Using AI to Analyse BIM Data
Greetings, fellow code enthusiasts! We're about to embark on an exciting journey through AI, BIM, and Speckle. Our guide? The trail blazed by our very own code pioneer, Jon Ryan.
We've maintained the essence of Jon's solution, ensuring you'll get a taste of his pragmatic approach. So, we've refactored, tidied up, and added a bunch of explanations, making it more universally applicable and easier to follow in a tutorial format.
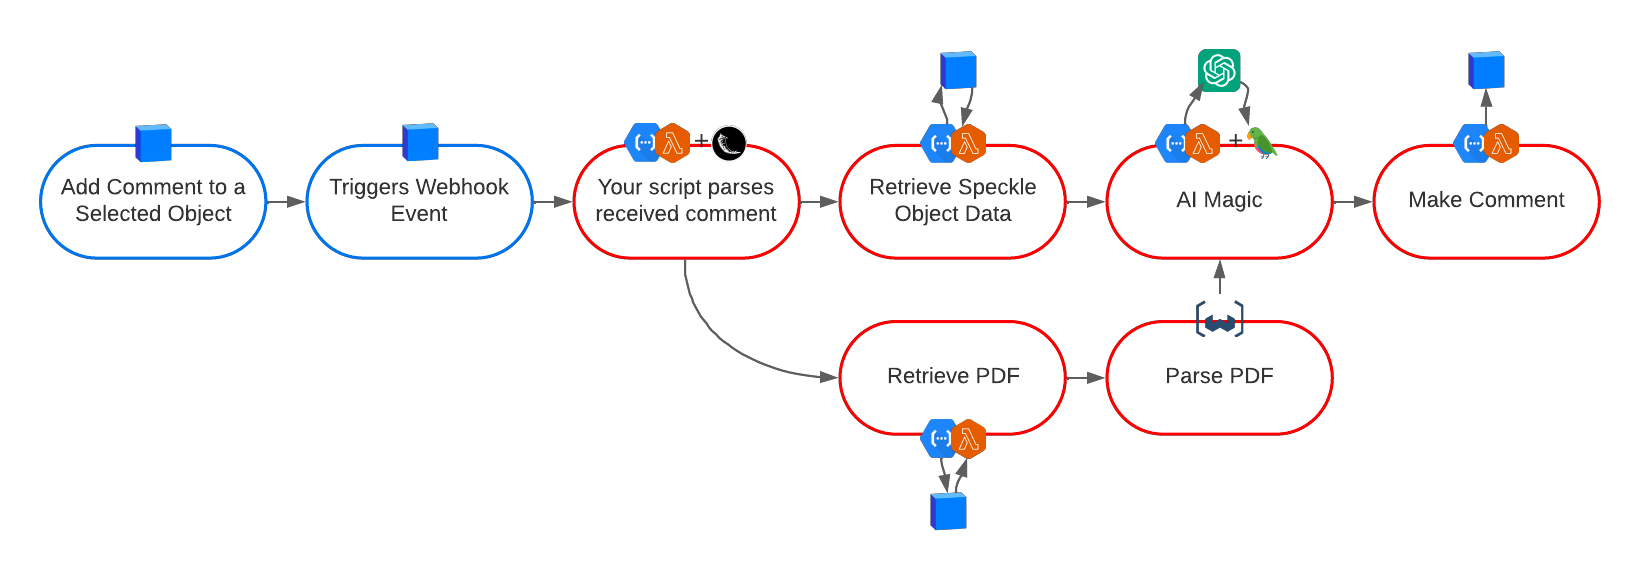
So, what are we building? An AI-powered commenting system for Speckle, a system that can understand user queries, fetch data from a Speckle server, and even dive into PDF attachments when needed. It's like having a trusty sidekick ready to rustle up answers at a moment's notice.
So, dust off your coding hat, saddle up your trusty steed, and ride into the sunset of AI and BIM. Let's start building your very own AI-powered Speckle commenting system! This tutorial builds up the code as it is relevant and isn’t a line-by-line follow-along. The final code is available on Git Hub.
Before You Start
Before we dive into the actual coding tutorial, it's important to highlight some of the prerequisites required to follow along with this guide:
- OpenAI API Key: You will need an API key from OpenAI to use their services, including the GPT-3 model. Obtaining this key requires a paid developer account with OpenAI. If you don't already have an account, you can create one on the OpenAI platform. After setting up your account and accepting the terms of use, you can generate your API key.
- Speckle Personal Access Token: To interact with Speckle's commenting feature via the API, you'll need a Personal Access Token. Select the appropriate scopes that grant permissions to access and manage comments. You can generate this token from your Speckle account settings.
::: tip
Important: Please keep these keys secure and do not share them publicly. Misusing your OpenAI API key can lead to unauthorised usage and potential costs. Whatever Scopes you grant to your Speckle Personal Access Token will be open to anyone who knows it. Use secure methods to store and use your keys, such as environment variables or key management services.
:::
Now that we've covered the prerequisites let's dive into how we can integrate ChatGPT with Speckle using LangChain!
The Stack
We’ll be using Python for this demonstration; many open-source tools are available to us to build up this demonstration quickly. It will make for a simple deployment at the same time. I’ll assume you have an installation already as part of your local system. I like to run things in a Virtual Environment to make building up and tearing down easier so as not to pollute my local machine with millions of dependencies.
You’ll be installing:
- Flask
- LangChain
- OpenAI
- PyPDF2
- Specklepy
- Weaviate
You will also need API keys for OpenAI and Speckle, which you can obtain from respective platforms.
Setting Up the Environment
The core of this demonstration lies in the interaction with Speckle's commenting system, which relies on Speckle's webhook support. Webhooks provide a powerful method for apps to be notified via HTTP when a specific event occurs on a server. They're useful for behind-the-scenes updates between the server and the application.
In our context, the webhooks allow us to trigger our AI model when new comments are added in Speckle.
1: Setting up the Flask Server and Commenting Webhook Endpoint
In the first part of this tutorial, we'll focus on setting up the foundation for our application. This involves creating a Flask server, defining the commenting webhook endpoint, and creating a dummy response as a placeholder for the AI-powered response functionality we'll develop later.
Flask is the goto lightweight web server gateway interface web application framework for Python. It's designed to help you start your project quickly and scale it easily. Let's set up a simple Flask server:
from flask import Flask
app = Flask(__name__)

@app.route('/')
def hello_world():
	return 'Hello, Speckleverse!'

if __name__ == '__main__':
	app.run(port=5000)
This code creates a new Flask web server. When you run this server, you should be able to visit http://localhost:5000 in your web browser and see the message "Hello, Speckleverse!"
That endpoint will not win us a Turing Award; let’s add something specific to what we need for Speckle Comments.
from flask import Flask, request
app = Flask(__name__)

flask_url = '0.0.0.0'
flask_port = 5000
flask_path = '/comment-webhook'

app = Flask(__name__)
executor = Executor(app) ## More on what that is later...

@app.route(flask_path, methods=['POST'])
def handle_webhook():
	print(request.json)
	return {'status': 'success'}

if __name__ == '__main__':
    if not os.path.exists('webhook'):
        os.makedirs('webhook')
    app.run(host=flask_url, port=flask_port)
Now that we have our server ready and our endpoint defined, we need to link them to Speckle. In Speckle, you can define webhook events to notify external services about changes. Nothing particularly magic about the route name comment-webhook, but if you add many of these to your Project Streams, every little helps distinguish which does what. Here's how you can set up a webhook for comments:
- Log into your Speckle account. Ensure that you are logged into the Speckle interface on the account associated with the project you're working on.
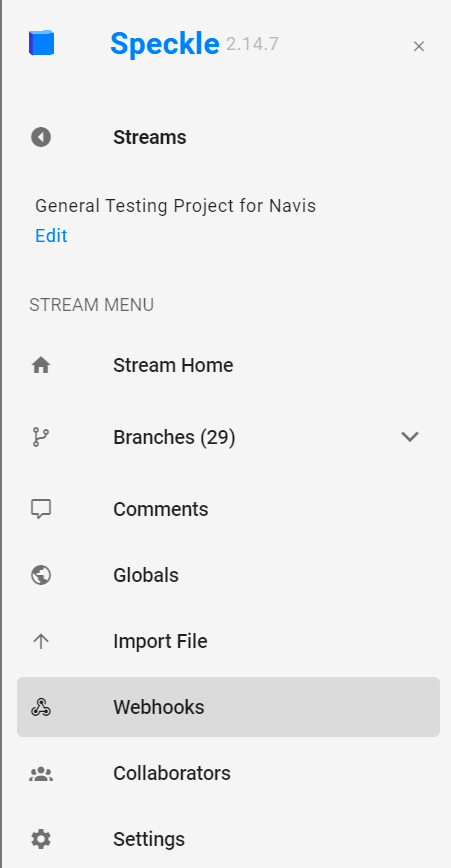
- Navigate to the Webhooks section. Currently, webhooks are defined per Project Stream. You can select the Stream you want to test with and then look for the "Webhooks" option.
3. Create a new webhook. Click on the option to create a new webhook. You will need to fill in some details:

- Payload URL: This should be where your Flask server is running and listening. If you're developing locally, this might be
http://localhost:5000/webhook. The example image here is for a great free webhook testing site at webhook.site. - Secret: This is good practice, but we won't demonstrate that as part of this tutorial.
- Events: You should select the types of events that trigger the webhook. Select just the new 'comment' events
comment_createdandcomment_repliedfor our purpose. - Active: Make sure the webhook is set to Enabled.
4. Save the webhook. After filling in these details, save the webhook. Speckle should send a POST request to your Flask server whenever a comment event occurs in your account or project.
Once you've set up the webhook, you can test it by creating a new comment in Speckle.

If everything is set up correctly, you should see the JSON data printed in your server's console. If you haven't deployed your server yet, use the webhook.site to create a temporary one and see what happens.
{
	"payload": {
		"streamId": "7ce9010d71",
		"userId": "d0b76afcd5",
		"activityMessage": "Comment added: 64ba1804f2 ([object Object])",
		"event": {
			"event_name": "comment_created",
			"data": {
			"input": {
				"streamId": "7ce9010d71",
				"resources": [
					{
						"resourceId": "20ce3429bc",
						"resourceType": "commit"
					}
				],
				"text":{
					"type": "doc",
					"content": [
						{
							"type": "paragraph",
							"content": [
								{
									"type": "text",
									"text": "This is a comment on an object."
								}
							]
						}
					]
				},
... snip
That is just the start of the webhook payload, snipped for now, but you can see the representation of the comment made in the image.
If you're developing on a local machine using a remote Speckle server like speckle.xyz, then Speckle events may not reach your localhost URL. In that case, you might need to use a service like ngrok to temporarily expose your local server to the internet. Always be careful when exposing your local development environment to the internet, and avoid it whenever possible in a production setting.
If you explore the comments in GraphQL Explorer, you can see the same data as in the payload.
::: tip
This is where we start getting into alpha state territory. With the next generation frontend incoming, there is a bunch of new, very helpful information that will be included in this payload as it will also be in a GraphQL query.
Inside a viewerState will be property selectedObjectIds which will include information we can use to get hold of the data for the selected objects at the time of commenting.
In the current front end, this data isn’t populated, sadly, and the theoretically congruent property of data.selection is now deprecated and also not populated. The Speckle Server Wizards are on the case, and we will update this tutorial to reflect when the new payload is implemented.
:::
For now, we will initiate a new AI interaction with some mechanical Turk action:
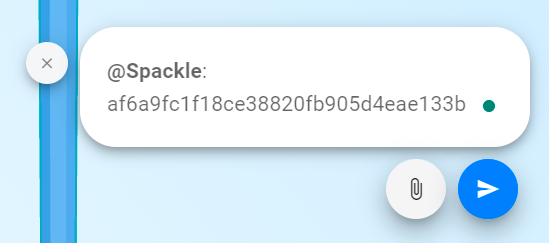
“Spackle”will initiate a conversation with our bot, and the string is the id of the object we want to discuss. You can get that for a selected item in the data browser:

Let's get back to the handle_webhook function:
## ROUTE HANDLERS

@app.route('/comment-webhook', methods=['POST'])
def handle_webhook():
    """
    Handles incoming webhook requests.

    Returns:
        str: An empty string.
        int: HTTP status code 200.
    """
    data = request.get_json()
    event_name = data['payload']['event']['event_name']
    print(f"event_name: {event_name}")

    if event_name == 'comment_created':
        print("new comment")
        stream_id, comment_text, thread_id = \\
            extract_comment_data(data['payload'])

        # Check if the comment begins with @Spackle
        # and has a valid object ID
        if comment_text.startswith("@Spackle"):
            print("ignored: invalid prompt")

        else:
						print("valid prompt detected")

            object_id = re.search(r'\\b\\w{20,}\\b', user_question)
            # If a matching string is found, use it as the object_id
            # If not, return None
            object_id = object_id.group() if object_id else None

            # If no object ID is provided, reply asking for it
            if len(object_id) <= 20:
                print("Object ID missing")
                bot_reply = "Hi, I'm Spackle. To assist you, I need a valid object ID."

                ### We will add a reply function later

            else:

                ### We will engage our Speckle chatbot here

    elif event_name == 'comment_replied':
        print("new reply")
        stream_id, user_id, reply_text, thread_id, comment_id = \\
            extract_reply_data(data['payload'])

        # Check if the bot did not generate the reply
        # and is part of a registered prompt conversation
        if user_reply.startswith("@Spackle"):
            print("ignored: reply from bot or unregistered conversation")
        else:
						print("reply to registered conversation detected")

            ### We will engage our Speckle chatbot again here


    return '', 200
The handle_webhook function now introduces two ‘gatekeeper’ conditionals. Firstly, the webhook payload should include an event field that is either the comment_created or the comment_replied events we set when registering the webhook. This still doesn’t make our server endpoint secure, but it is another help (we should implement the secret handler).
The method to extract the relevant data for checking is:
## PAYLOAD HANDLERS

def extract_comment_data(payload: Dict[str, Any]) -> Tuple[str, str, str]:
    """
    Extracts comment data from the payload.

    Args:
        payload (dict): The payload from the webhook.

    Returns:
        tuple: A tuple containing the stream ID,
               comment text, and thread ID.
    """
    stream_id = payload['streamId']
    activity_message = payload['activityMessage']
    thread_id = activity_message.split(': ')[1].split(' ')[0]
    comment_text = payload['event']['data']['input']\\
                   ['text']['content'][0]['content'][0]['text']
    comment_text = comment_text.strip()

    return stream_id, comment_text, thread_id

def extract_reply_data(payload: Dict[str, Any]) -> Tuple[str, str, str, str, str]:
    """
    Extracts reply data from the payload.

    Args:
        payload (dict): The payload from the webhook.

    Returns:
        tuple: A tuple containing the stream ID, user ID,
               reply text, thread ID, and comment ID.
    """
    stream_id = payload['streamId']
    user_id = payload['userId']
    activity_message = payload['activityMessage']
    comment_id = activity_message.split('#')[-1].split(' ')[0] \\
                 if '#' in activity_message else None

    if 'parentComment' in payload['event']['data']['input']:
        thread_id = payload['event']['data']['input']\\
                    ['parentComment']
        reply_text = payload['event']['data']['input']\\
                     ['text']['content'][0]['content'][0]['text']
    else:
        thread_id = payload['event']['data']['input']['threadId']
        reply_text = payload['event']['data']['input']\\
                     ['content']['doc']['content'][0]\\
                     ['content'][0]['text']

    reply_text = reply_text.strip()

    return stream_id, user_id, reply_text, thread_id, comment_id
All engagements shall start with our prompt “@Spackle”. This is helpful in two ways; firstly, it is a user-friendly indicator that of all the people that could be engaging with a thread, only @Spackle comments are relevant for the bot to act upon.
The next conditional is that the thread should have an objectId included. This won’t be necessary when the Speckle WebUI fully ties these events together, but in this case, we need it as part of the conversation.
We haven’t got anything responding yet, but if your server is running, you can test that all the print statements are shown in the logs.
Getting Threads and Attachments
No comment exists without context and the thread it is in. A thread is a chain of comments; the history provides context to each subsequent interaction. This is an occasion where the code is really easy to understand what is going on.
def speckle_thread(stream_id: str) -> Optional[Dict[str, Any]]:
    """
    Fetches the comment thread for a given stream ID from the Speckle server.

    Args:
        stream_id (str): The ID of the stream.

    Returns:
        dict: The comment thread data is successful, None otherwise.
    """
    query = """
        query Query($projectId: String!) {
          project(id: $projectId) {
            commentThreads {
              items {
                id
                rawText
                replies {
                  items {
                    id
                    authorId
                    createdAt
                    rawText
                  }
                }
              }
            }
          }
        }
    """
    variables = {"projectId": stream_id}
    data = speckle_graphql_query(query, variables)
    return data['data'] if data and 'data' in data else None

def extract_text_from_pdf(pdf_path: str) -> str:
    """
    Extracts text from a PDF file.

    Args:
        pdf_path (str): The path to the PDF file.

    Returns:
        str: The extracted text.
    """
    pdf_reader = PdfReader(pdf_path)
    return "".join(page.extract_text() for page in pdf_reader.pages)

def get_attachment(stream_id: str, attachment_id: str,
                   thread_specific_filename: str,
                   thread_id: str, folder: str = "attachments") -> None:
    """
    Downloads an attachment from the Speckle server and saves it to a local folder.

    Args:
        stream_id (str): The ID of the stream.
        attachment_id (str): The ID of the attachment.
        thread_specific_filename (str): The filename to save the attachment as.
        thread_id (str): The ID of the thread.
        folder (str, optional): The folder to save the attachment in. Defaults to "attachments".
    """
    url = f"{speckle_url}api/stream/{stream_id}/blob/{attachment_id}"
    response = requests.get(url, stream=True)
    if response.status_code == 200:
        os.makedirs(folder, exist_ok=True)
        with open(os.path.join(folder, thread_specific_filename), 'wb') as f:
            f.write(response.content)
        text = extract_text_from_pdf(os.path.join(folder, thread_specific_filename))
        nltk_text_splitter = NLTKTextSplitter(chunk_size=1000)
        chunks = nltk_text_splitter.split_text(text)
        for chunk in chunks:
            data_object = {"text": chunk, "filename": thread_specific_filename}
            weaviate_id = client.data_object.create(data_object, class_name="Documents")
    else:
        print(f"Failed to download the file. Status code: {response.status_code}")

def attachment(comment_id: str, thread_id: str, stream_id: str) -> Optional[str]:
    """
    Fetches the attachments for a comment from the Speckle server.

    Args:
        comment_id (str): The ID of the comment.
        thread_id (str): The ID of the thread.
        stream_id (str): The ID of the stream.

    Returns:
        str: The filename of the downloaded attachment if successful, None otherwise.
    """
    query = """
        query Query($commentId: String!, $streamId: String!) {
            comment(id: $commentId, streamId: $streamId) {
                id
                text {
                    attachments {
                        id
                        fileName
                        fileHash
                        fileType
                        fileSize
                    }
                }
            }
        }
    """
    variables = {"commentId": comment_id,"streamId": stream_id}
    data = speckle_graphql_query(query, variables)
    if data and 'data' in data:
        attachments = data['data']['comment']['text']['attachments']
        for attachment in attachments:
            if attachment['fileType'].lower() == 'pdf':
                thread_specific_filename = f"{thread_id}_{attachment['fileName']}"
                get_attachment(stream_id, attachment['id'], thread_specific_filename, thread_id)
                return thread_specific_filename
            else:
                print(f"Skipped non-pdf file: {attachment['fileName']}")
    else:
        print("Failed to fetch comment attachments")
        return None
We can now move on from Comment data interactions, but not yet to the AI magic.
2. Getting Speckle Data
We are still not looking at anything remotely AI, but we can help ourselves with some Speckle data handlers. We should only need to receive object data, which is relatively straightforward.
from specklepy.objects import Base
from specklepy.api.client import SpeckleClient
from specklepy.transports.server import ServerTransport
from specklepy.api import operations
from typing import Any, Dict

def get_speckle_client(host: str, token: str) -> SpeckleClient:
    """
    Authenticates a Speckle client using a host and token.

    Args:
        host (str): The host address for the Speckle server.
        token (str): The personal access token for authentication.

    Returns:
        SpeckleClient: An authenticated Speckle client.
    """
    client = SpeckleClient(host=host)
    client.authenticate_with_token(token)
    return client

def get_object_data(
    client: SpeckleClient, stream_id: str, object_id: str
) -> Dict[str, Any]:
    """
    Fetches an object from the Speckle server based on its stream id.
    Processes the object, extracting key information such as type, family, and
    additional parameters depending on the object type.

    Args:
        client (SpeckleClient): A client instance used to connect to the Speckle server.
        stream_id (str): The id of the stream from which to fetch the object.
        object_id (str): The id of the object to fetch.

    Returns:
        Dict[str, Any]: A dictionary containing key information about the fetched object.
    """
    transport = ServerTransport(client=client, stream_id=stream_id)
    original_object: Any = operations.receive(
        obj_id=object_id, remote_transport=transport
    )
    result_dict: Dict[str, Any] = {}

    if (
        original_object.speckle_type
        == "Objects.Other.Instance:Objects.Other.Revit.RevitInstance"
    ):
        definition_object: Any = original_object["definition"]
    else:
        definition_object: Any = original_object

    result_dict["type"] = definition_object.type
    result_dict["family"] = definition_object.family
    result_dict.update(get_object_parameters(definition_object))

    return result_dict

def get_object_parameters(obj: Base) -> Dict[str, Any]:
    """
    Fetches dynamic parameters from the object specific to Revit.
    Each parameter's name and value are then stored in a dictionary for easy access.

    Args:
        obj (Base): The Speckle object from which to extract parameters.

    Returns:
        Dict[str, Any]: A dictionary mapping parameter names to their values.
    """
    parameters_data = obj["parameters"]
    parameters = parameters_data.get_dynamic_member_names()

    result_dict: Dict[str, Any] = {
        parameters_data[parameter]["name"]: parameters_data[parameter]["value"]
        for parameter in parameters
    }

    return result_dict
These three functions will get the object data to feed it to the AI bot
An example of calling them would be:
### This allows for secrets to be set in a .env file adjacent to the script
from dotenv import load_dotenv
load_dotenv()

speckle_token: Optional[str] = os.getenv("ACCESS_TOKEN")
speckle_host: Optional[str] = os.getenv("HOST_SERVER")

if speckle_token is None or speckle_host is None:
    raise ValueError("Missing environment variables.")

speckle_client: SpeckleClient = get_speckle_client(speckle_host, speckle_token)

stream_id: str = "{{STREAM_ID}}"
object_id: str = "{{OBJECT_ID}}"

object: Dict[str, Any] = get_object_data(speckle_client, stream_id, object_id)
But we will be calling them from something called an Executor.
3. LangChain Tools
In the context of LangChain, "Tools" are essentially the different components or services that LangChain can interact with. These could be various APIs, databases, or other software that Langchain can send requests or receive data.
For example, in the case of integrating LangChain with Speckle and OpenAI's GPT-3, the "tools" would include the Speckle API (for interacting with Speckle data and services) and the OpenAI API (for generating responses using GPT-3).
In LangChain, you can define different tools and specify how LangChain should interact with them. This includes defining the requests that LangChain can send to a tool, the responses it can expect to receive, and how to handle those responses. This allows LangChain to act as an "orchestrator", coordinating interactions between different tools and services to achieve a desired outcome.
The previous methods will be wrapped up as a Tool.
from typing import Any

# Define a tool for the Langchain agent to fetch Speckle data.
def get_data(input: str) -> str:
    """
    Fetches Speckle data and formats it for use by the
    Langchain agent.

    Args:
        input (str): The input string (search term).

    Returns:
        str: The formatted Speckle data.
    """
    speckle_client = get_speckle_client(speckle_host,
                                        speckle_token)

    # Get all data for the object
    speckle_data = get_object_data(speckle_client,
                                   stream_id, object_id)

    # Pretty-print JSON - Langchain and GPT will not
    # understand a Python dict
    data_formatted = json.dumps(speckle_data, indent=2)

    # Providing context with data improves GPT response
    description = (f"All available parameter data has been "
                   f"provided below related to {input}, choose "
                   f"suitable parameter value(s) matching the "
                   f"question. All units are metric.\\n")

    description_and_data = description + data_formatted
    return description_and_data

get_data_tool = Tool(
    name="DataSearch",
    func=get_data,
    description=(f"Useful when additional data is needed. All "
                 f"data relevant to the question data will be "
                 f"provided. After 'Action input:', you must "
                 f"provide a single search string within ticks "
                 f"in the following format: 'search_term'")
)
The first description assignment is a feature of engaging with an LLM more usefully responding to textual inputs. The second description is the Langchain boilerplate.
The next Tool will be the Weaviate tool. Weaviate is included as a library for this demonstration as it can parse a PDF file’s text and ‘vectorise’ it for LLM consumption. Part 1 of this blog post/tutorial explained this step more.
This function is part of the interaction between LangChain and Weaviate, allowing LangChain to leverage Weaviate's powerful vector search capabilities to find relevant data based on user input.
# The following is only for when there is an attachment
# in the current comment.
comment_id = thread_id
filename = None
filename = attachment(comment_id, thread_id, stream_id)
print(f"filename: {filename}")

def weaviate_neartext(keyword: str, filename: str = filename,
                      limit: int = 2) -> Any:
    """
    Searches for a keyword in the attached document(s)
    using Weaviate.

    Args:
        keyword (str): The keyword to search for.
        filename (str, optional): The file name to
                                  search in. Defaults to
                                  the filename.
        limit (int, optional): The maximum number of results
                               to return. Defaults to 2.

    Returns:
        Any: The search results.
    """
    near_text = {"concepts": keyword}
    query = (
        client.query
        .get("Documents", ["text", "filename"])
        .with_additional(["distance"])
        .with_near_text(near_text)
        .with_limit(limit)
    )
    if filename:
        where_filter = {
            "path": ["filename"],
            "operator": "Equal",
            "valueText": filename
        }
        query = query.with_where(where_filter)
    results = query.do()
    return results

weaviate_neartext_tool = Tool(
    name = 'DocSearch',
    func = weaviate_neartext,
    description = f"Used for searching in the attached document(s).
                    After 'Action input:', you must provide a
                    single search string within ticks in the
                    following format: 'search_term'"
)
The weaviate_neartext function performs a semantic search in Weaviate's database for semantically similar documents to a given keyword. This function takes three parameters: keyword, filename, and limit. The keyword is the text that will be used for the semantic search. The filename is the file's name attached to the current comment. The limit parameter limits the number of results returned by the function.
The function constructs a query to Weaviate using the keyword and filename parameters. If a filename is provided, the function adds a where filter to the query to only return results from the document with the given filename. The function then executes the query and returns the results.
If a filename is attached to the current comment, the weaviate_neartext_tool is added to the list of tools that LangChain can use. This allows LangChain to use the weaviate_neartext_tool to perform semantic searches in Weaviate's database based on the content of the attached file.
In summary, when executing LangChain, we define custom Tools that it uses to modify its interaction with the LLM that is pointed at. There can be nuances to accommodate, but LangChain has been built with specifically designed interfaces so that a developer only needs to define tools that shape data inputs in the most compatible way.
So we have defined two Tools, a Get Speckle Data Tool and a Weaviate Neartext Tool. Like with the composition of the Speckle interaction into a Tool, we now need to compose these tools into an Executor.
4. Executors
This is a scary-sounding, relatively typical method within the Flask server. Executor is a class from the flask_executor library in Python. This library provides a simple way to execute and manage background tasks in a Flask application.
The Executor class is part of the concurrent.futures module in Python provides a high-level interface for executing “callables” asynchronously. It's designed to abstract the complexities of multiprocessing (CPU-bound tasks) and multithreading (I/O-bound tasks) in Python, allowing developers to write concurrent code more easily.
In the context of a Flask application, an Executor can run time-consuming tasks in the background, freeing up the main application thread to continue handling requests. This can greatly improve the application's responsiveness, especially when dealing with tasks that take a long time to complete, such as complex calculations, network requests, or interactions with external APIs (like the OpenAI API in this demo).
We will define two Executors:
Comment
### EXECUTORS ###

def comment(data: Dict[str, Any], stream_id: str, object_id: str,
            user_question: str, thread_id: str) -> None:
    """
    Handles a comment event. It uses the data from the comment
    to initiate and run a Langchain agent, which generates a
    response. The response is then posted as a reply comment.

    Args:
        data (Dict[str, Any]): The data from the comment.
        stream_id (str): The ID of the stream the comment is in.
        object_id (str): The ID of the object the comment is about.
        user_question (str): The user's question from the comment.
        thread_id (str): The ID of the thread the comment is in.
    """
    # Insert the Speckle Data Tool from earlier here
    def get_data(input: str) -> str:
        ...

    tools = [get_data_tool]

    # Insert the Weaviate Tool from earlier here
    def weaviate_neartext_tool(keyword: str, filename: str = filename,
                               limit: int = 2) -> Any:
        ...

    if filename is not None:
        tools.append(weaviate_neartext_tool)

    tool_names = [tool.name for tool in tools]
    print(f"tool_names: {tool_names}")

    # initiate and run the langchain agent
    prompt = create_prompt(tools)

    answer = ### DO AI MAGIC HERE AND GET RESPONSE

    # Post the answer as a reply comment
    speckle_reply(thread_id, answer)
and Reply
def reply(data: Dict[str, Any], stream_id: str, user_id: str,
          user_question: str, thread_id: str,
          comment_id: str) -> None:
    """
    Handles a reply event. It uses the data from the reply to
    initiate and run a Langchain agent, which generates a
    response. The response is then posted as a reply comment.

    Args:
        data (Dict[str, Any]): The data from the reply.
        stream_id (str): The ID of the stream the reply is in.
        user_id (str): The user's ID who made the reply.
        user_question (str): The user's question from the reply.
        thread_id (str): The ID of the thread the reply is in.
        comment_id (str): The ID of the comment the reply is to.
    """
    # get full comment thread, extract object_id from
    # the first comment
    raw_thread = speckle_thread(stream_id)
    conversation, object_id = \\
        extract_and_transform_thread(raw_thread, thread_id)

    # Use OpenAI to compose standalone questions from
    # conversation history
    question = gpt_standalone(conversation)

    # Insert the Speckle Data Tool from earlier here
    def get_data(input: str) -> str:
        ...

    tools = [get_data_tool]

    filenames = []
    attachment_filename = attachment(comment_id,
                                     thread_id, stream_id)
    if attachment_filename:
        filenames.append(attachment_filename)
    previous_attachments = [os.path.basename(f) for f in
                            glob.glob(f"attachments/{thread_id}_*")]
    filenames.extend(previous_attachments)

    def weaviate_neartext(keyword: str,
                          filenames: List[str] = filenames,
                          limit: int = 2) -> Any:
        ...

    weaviate_neartext_tool = Tool(
        name = 'DocSearch',
        func = weaviate_neartext,
        description = f"Used for searching in attached document(s). After 'Action input:', you must provide a single search string within ticks in the following format: 'search_term'"
    )

    if filenames:
        tools.append(weaviate_neartext_tool)

    tool_names = [tool.name for tool in tools]

    # initiate and run the langchain agent
    prompt = create_prompt(tools)

    answer = ### DO AI MAGIC HERE AND GET RESPONSE

    # Post the answer as a reply comment
    speckle_reply(thread_id, final_answer)
There is repetition here partly because of how the tools get passed to LangChain and their scoped variables. The Reply method is mostly the same as the Comment function except that each time it is called, it passes more and more information to LangChain and the OpenAI GPT API. This is because every interaction is individual. Unlike when using the web interface of ChatGPT and you can have a long-running conversation seemingly without limit. There is no state in the Flask webhook handling server or in the LangChain Agent.
We can now reference these executors in the webhook handler:
executor.submit(reply, data, stream_id, user_id, comment_text, thread_id, comment_id)
Weaviate
While the Weaviate vector database is open-source, one flaw in this being a simple demo or at least a major caveat is that to utilise it in the PDF parsing Tools, a Weaviate server needs to be already running. If your entire setup is on localhost, ensuring it is running before you spin up your webhook endpoint server is a simple matter. If deployed anywhere else, you must run it as a managed service somewhere. Just as Speckle has an Enterprise option that can take the hassle of maintaining and running a server infrastructure in the cloud, Weaviate, the company also offers a cloud option. You can deploy locally or to GCP, AWS, or Digital Ocean et al., but this step requires configuring. I have opted to run locally and set up another ngrok tunnel for the demo.
### WEAVIATE ###
weaviate_url = '<http://localhost:8080/>' # Or whatever...

def get_weaviate_client(weaviate_url: str, api_key: str) -> weaviate.Client:
    """
    This function takes a Weaviate URL and an API key and uses them to authenticate a Weaviate client.

    Parameters:
    weaviate_url (str): The URL for the Weaviate server.
    api_key (str): The API key for authentication.

    Returns:
    weaviate.Client: An authenticated Weaviate client.
    """
    client = weaviate.Client(
        url=weaviate_url,
        additional_headers={
            "X-OpenAI-API-Key": api_key
        }
    )
    return client

def weaviate_document(client: weaviate.Client, text: str, filename: str) -> Dict[str, str]:
    """
    This function uploads a document to Weaviate.

    Parameters:
    client (weaviate.Client): The Weaviate client to use for the upload.
    text (str): The text of the document to upload.
    filename (str): The filename of the document to upload.

    Returns:
    Dict[str, str]: A dictionary containing the Weaviate ID of the uploaded document.
    """
    data_object = {
        "text": text,
        "filename": filename
    }
    weaviate_id = client.data_object.create(data_object, class_name="Documents")
    return weaviate_id
The weaviate_document function creates a new data object in Weaviate. This data object represents a document, and it is created in the "Documents" class on the Weaviate server. The text and filename parameters are used to set the document's properties.
The get_weaviate_client function is a helper function that creates and authenticates a Weaviate client, which can interact with the Weaviate server. This function takes the URL of the Weaviate server and an API key as parameters and returns an authenticated weaviate.Client object.
5. Agents
The enigmatic DO AI MAGIC AND GET RESPONSE pseudo command is within both Executor functions. Of course, we will replace that with what we need, but here is a little explanation of how we take all those Tools, Data, and Vectors and engage with the LLM.
In the context of LangChain, an "Agent" is a component that represents a specific instance of a language model, such as GPT-3. The Agent generates responses to user inputs and interacts with other system components.
Each Agent is associated with a set of "Tools" that it can use to perform specific tasks. For example, an Agent might have a Tool for querying a database, a Tool for performing calculations, or a Tool for interacting with an API. The Agent uses these Tools to generate linguistically coherent, contextually relevant, and actionable responses.
In this demo, we create an Agent using the GPT-3 language model and the Tools for interacting with Speckle and Weaviate. Hence the Tools are the interaction capabilities of the Agent.
We will replace the answer = ### DO AI MAGIC HERE AND GET RESPONSE line with this:
from langchain.agents import Tool, AgentExecutor,
                             LLMSingleActionAgent,
                             AgentOutputParser
from langchain.prompts import BaseChatPromptTemplate
from langchain import LLMChain
...

prompt = create_prompt(tools)

llm_chain = LLMChain(llm=llm, prompt=prompt)

agent = LLMSingleActionAgent(
    llm_chain=llm_chain,
    output_parser=output_parser,
    stop=["\\nObservation:"],
    allowed_tools=tool_names
)

agent_executor = AgentExecutor.from_agent_and_tools(
    agent=agent, tools=tools, verbose=True
)

answer = agent_executor.run(user_question)
This code block is setting up and running the LangChain agent, which manages the interaction between the user's question, the language model (GPT), and the tools (in this case, Weaviate).
Here's a breakdown of what each line is doing:
prompt = create_prompt(tools): This line creates a prompt for the language model. The prompt is a piece of text that is used to start the conversation with the language model. In this case, the prompt is created based on the available tools.llm_chain = LLMChain(llm=llm, prompt=prompt): This line creates a LangChain LLMChain object. An LLMChain is a sequence of language models and prompts to generate responses. The LLMChain consists of a single language model (GPT) and the prompt created in the previous line.agent = LLMSingleActionAgent(llm_chain=llm_chain, output_parser=output_parser, stop=["\\nObservation:"], allowed_tools=tool_names): This line is creating a LangChain agent. The agent manages the interaction between the user's question, the language model, and the tools. The LLMSingleActionAgent is an agent that performs a single action (i.e., generates a single response) for each user question.agent_executor = AgentExecutor.from_agent_and_tools(agent=agent, tools=tools, verbose=True): This line creates an AgentExecutor responsible for executing the agent's actions. The AgentExecutor takes the agent and the tools as input and manages the process of running the agent and using the tools to generate responses.final_answer = agent_executor.run(user_question): This line runs the agent executor with the user's question as input. The agent executor uses the language model and the tools to generate a response to the user's question, and this response is stored in thefinal_answervariable.
The Prompt
Part of the “fun” of many of the ML/AI tools the world has been playing with recently is the “Art of the Prompt”. Once you get past the mysteries of sometimes midjourney, stable foundation, dall-e giving you exactly what you want and other times it is a surreal Alice Through the Looking Glass journey you start seeing more and more people shilling their “perfect prompts”. While that snake oil may have limited value, some truth exists in the background.
The prompt is a crucial part of using language models effectively. It sets the stage for the interaction, providing the model with initial context and guiding its responses. In this case, the prompt is designed to instruct the language model as a helpful assistant, using tools to answer questions about a Speckle BIM model.
I haven’t paid much attention to the example code Jon Ryan shared from his original hack. You’ll notice that a large glob of text defines the template for the prompt. The template includes placeholders for the input question, the tools available to the language model, and the steps the language model has taken so far. The template also includes instructions for the language model to structure its responses before dumping the user query and PDF tokens into it for processing.
LangChain's summarization feature creates a context-aware, standalone question from a conversation history. In other words, it generates a standalone question that can make sense without the previous chat context. The function gpt_standalone(text) leverages this feature. It defines a prompt template where the conversation history is supplied and instructs the model to generate a standalone question.
The function load_summarize_chain(llm, chain_type="stuff", prompt=STUFF_PROMPT) loads the summarisation chain from LangChain, which encapsulates the summarization task. This chain is then executed on the given document, which is the text to be summarised, and it returns the summarised content or, in this case, a standalone question.
In summary, while the conversation in the chatbot context continuously builds, the summarisation feature helps derive a standalone question that can be used independently of the conversation history, which can be helpful in situations where the context is unavailable, or the goal is to minimize reliance on previous interactions.
### LANGCHAIN ###

# Two options for llm, gpt3 (davinci) and gpt-3.5. The latter seems quicker and smarter but not as good at following instructions. I had more success with DaVinci. GPT-3.5 might need a custom parser to handle when it goes off track.

llm = OpenAI(temperature=0, model="text-davinci-003", openai_api_key=os.getenv["OPENAI_API_KEY"])
chat_llm = OpenAI(temperature=0, model="gpt-3.5-turbo", openai_api_key=os.getenv["OPENAI_API_KEY"])

# custom prompt template, changes made here greatly affect the output
template = """
You are a helpful assistant that follows instructions extremely well. Answer the question regarding a certain object in a BIM model as best you can.

You have access to the following tools:

{tools}

Use the following format:

Question: the input question you must answer
Thought: you should always think about what to do
Action: the action to take should be one of [{tool_names}]
Action Input: the input to the action
Observation: the result of the action
... (this Thought/Action/Action Input/Observation can repeat N times)
Thought: I now know the final answer
Final Answer: the final answer to the original input question

These were previous tasks you completed:

Begin!

Question: {input}

{agent_scratchpad}
"""

# wraps the langchain summarisation feature
def gpt_standalone(text):
    prompt_template = """Your task is to analyse the provided conversation history and formulate a standalone question so that it makes sense to the receiver. Be concise; no need for pleasantries.

Conversation history:

{text}

Your forwarded question:"""

    STUFF_PROMPT = PromptTemplate(template=prompt_template, input_variables=["text"])

    chain = load_summarize_chain(llm, chain_type="stuff", prompt=STUFF_PROMPT)

    # Converting as langchain summarise needs doc input; there may be a neater solution
    doc = [Document(page_content=text)]

    gpt_response = chain.run(doc)
    print(f"gpt_response: {gpt_response}")
    return gpt_response

# default langchain stuff from here on:

# Set up a prompt template
class CustomPromptTemplate(BaseChatPromptTemplate):
    """
    A custom prompt template for the Langchain agent.
    """
    template: str
    tools: List[Tool]
    data_json: str = ''

    def format_messages(self, **kwargs) -> List[HumanMessage]:
        """
        Format the messages for the agent.

        Args:
            **kwargs: Keyword arguments containing the data for the messages.

        Returns:
            List[HumanMessage]: A list of formatted messages.
        """
        intermediate_steps = kwargs.pop("intermediate_steps")
        thoughts = "\\n".join(
            f"{action.log}\\nObservation: {observation}\\nThought: "
            for action, observation in intermediate_steps
        )
        kwargs["agent_scratchpad"] = thoughts
        kwargs["tools"] = "\\n".join(f"{tool.name}: {tool.description}" for tool in self.tools)
        kwargs["tool_names"] = ", ".join(tool.name for tool in self.tools)
        kwargs["data_json"] = self.data_json
        formatted = self.template.format(**kwargs)
        return [HumanMessage(content=formatted)]

def create_prompt(tools: List[Tool]) -> BaseChatPromptTemplate:
    """
    Create a prompt for the agent.

    Args:
        tools (List[Tool]): The tools available to the agent.

    Returns:
        BaseChatPromptTemplate: The created prompt.
    """
    return CustomPromptTemplate(
        template=template,
        tools=tools,
        input_variables=["input", "intermediate_steps"]
    )
This is an excellent demonstration of the power and flexibility that the LangChain library provides, allowing you to easily adapt and customize the behaviour of their AI models to your specific needs.
Two further explanations:
class CustomPromptTemplate(BaseChatPromptTemplate): This code block defines a custom prompt template class. This class inherits from theBaseChatPromptTemplateclass provided by LangChain and overrides theformat_messagesmethod to format the prompt according to the custom template.def create_prompt(tools): This function creates an instance of the custom prompt template using the provided list of tools.
The Response
Inside the agent is another function we have to define, the output_parser:
class CustomOutputParser(AgentOutputParser):
    """
    Custom Output Parser for Langchain's Agent.
    This class is used to parse the output of the language model (LLM).
    """

    def parse(self, llm_output: str) -> Union[AgentAction, AgentFinish]:
        """
        Parse the output of the language model (LLM).

        Args:
            llm_output (str): The output from the LLM.

        Returns:
            AgentAction: If the LLM output indicates an action to be taken.
            AgentFinish: If the LLM output indicates a final answer.

        Raises:
            ValueError: If the LLM output cannot be parsed.
        """
        if "Final Answer:" in llm_output:
            final_answer = llm_output.split("Final Answer:")[-1].strip()
            return AgentFinish(return_values={"output": final_answer}, log=llm_output)

        match = re.search(r"Action\\s*\\d*\\s*:(.*?)\\nAction\\s*\\d*\\s*Input\\s*\\d*\\s*:[\\s]*(.*)", llm_output, re.DOTALL)
        if not match:
            raise ValueError(f"Could not parse LLM output: `{llm_output}`")

        action = match.group(1).strip()
        action_input = match.group(2).strip(" ").strip('"')
        return AgentAction(tool=action, tool_input=action_input, log=llm_output)

output_parser = CustomOutputParser()
This block of code defines a custom output parser for the Langchain agent. The output parser interprets the language model (GPT) output and decides what the agent should do next.
Here's a breakdown of what each part of the code is doing:
class CustomOutputParser(AgentOutputParser): This line defines a new class calledCustomOutputParserthat inherits from theAgentOutputParserclass provided by LangChain. This means thatCustomOutputParserwill have all the functionality ofAgentOutputParser, but can also have additional functionality defined within it.def parse(self, llm_output: str) -> Union[AgentAction, AgentFinish]: This line defines a new method calledparsethat takes the output of the language model (a string) as input and returns either anAgentActionor anAgentFinishobject.AgentActionrepresents an action that the agent should take (like using a tool), andAgentFinishrepresents the end of the agent's actions.- The
if "Final Answer:" in llm_output:block checks if the language model's output contains the string "Final Answer:". If it does, the language model has generated a final answer to the user's question, and the agent should stop running. In this case, the method returns anAgentFinishobject with the final answer and the full output of the language model. - The
regex = r"Action\\s*\\d*\\s*:(.*?)\\nAction\\s*\\d*\\s*Input\\s*\\d*\\s*:[\\s]*(.*)"andmatch = re.search(regex, llm_output, re.DOTALL)lines are using a regular expression to extract the action and action input from the language model's output. The action is the name of the tool that the agent should use, and the active input is the input that should be passed to the tool. - The
return AgentAction(tool=action, tool_input=action_input.strip(" ").strip('"'), log=llm_output)line returns anAgentActionobject with the extracted action and action input. This tells the agent to use the specified tool with the specified input. output_parser = CustomOutputParser()is creating an instance of theCustomOutputParserclass. The agent can use this instance to parse the output of the language model.
6. Reply to the user
If we roll back to the two Executors (Comment and Reply), the last act in each was to reply back to the Project Stream; otherwise, what was all this for?
The speckle_reply function is used to post the final response generated by the AI agent back to the Speckle server. This function is called after the AI agent has processed the user's question, possibly used one or more tools to gather additional information, and composed a final answer. The answer is then posted as a reply to the original comment thread where the question was asked.
This function is not directly related to the tools used by the AI agent, but it is a crucial part of the overall process. After the AI agent has done its work, the speckle_reply function ensures that the answer is communicated to the user in the appropriate context.
In the context of the two tools (get_data_tool and weaviate_neartext_tool), this function would be used after these tools have been used to gather additional data and search through documents, and the AI agent has used this information to generate a response. The speckle_reply function would then post this response back to the Speckle server.
def speckle_reply(thread_id: str, reply_text: str) -> Optional[Dict[str, Any]]:
    """
    Posts a reply to a comment thread on the Speckle server.

    Args:
        thread_id (str): The ID of the comment thread.
        reply_text (str): The content of the reply.

    Returns:
        dict: The server's response data if successful, None otherwise.
    """
    mutation = """
        mutation Mutation($input: CreateCommentReplyInput!) {
            commentMutations {
                reply(input: $input) {
                    id
                }
            }
        }
    """
    variables = {
        "input": {
            "content": {
                "doc": {
                    "type": "doc",
                    "content": [
                        {
                            "type": "paragraph",
                            "content": [
                                {
                                    "type": "text",
                                    "text": reply_text
                                }
                            ]
                        }
                    ]
                }
            },
            "threadId": thread_id
        }
    }
    data = speckle_graphql_query(mutation, variables)
    return data['data'] if data and 'data' in data else None
The Grand Finale
We've been on quite the rollercoaster ride, folks, haven't we? We've traversed the wild terrain of AI, BIM, and Speckle-like intrepid explorers in a world of code and conversation. We've seen our AI agent, let's call it "Spackle", flex its muscles, answering queries about BIM objects, fetching data from the Speckle server, and even diving headfirst into PDF attachments like it's hunting for buried treasure.
We've stood in awe of the might of OpenAI's language models and seen how LangChain, the trusty sidekick, guides these models to produce useful and targeted responses like a heat-seeking missile.
But let's not get too starry-eyed. Spackle, while impressive, isn't perfect. It's got a few quirks:
- BIM Concepts: Spackle's understanding of BIM concepts is a bit like my understanding of quantum physics - limited. It might not always provide the most accurate or meaningful responses to complex BIM queries.
- PDF Attachment Handling: Right now, Spackle can only handle PDFs. It's like a dog that only fetches sticks but ignores the frisbee. And it can only extract text, not images or other media. So, no funny cat pictures, sorry!
- Token Limitations: The LangChain/LLM tools have a token limit. It's like trying to stuff a giant marshmallow into a tiny cup. Long conversations or large documents need to be split up, which could affect the quality of the responses. It will inevitably use up developer credits also.
- Data Privacy and Security: Our example doesn't include any measures to protect the privacy or security of the BIM data or the user's queries. It's like leaving your front door open. You must add your own locks and alarms in a real-world application.
- Limited BIM Object Types: The current example focuses on Revit objects. You could extend this to handle other BIM objects, such as those from AutoCAD, ArchiCAD, or other BIM software. This would involve modifying the
get_object_dataandget_object_parametersfunctions to handle these other BIM objects' different data structures and properties.
But let's not forget to celebrate our victories! We've built an AI agent to interact with a complex BIM system, understand user queries, fetch and process data, and generate meaningful responses. That's like teaching a monkey to do calculus!
Speckle Real-Time Commenting was already awesome; as you explore a 3d model in multiplayer mode with others wherever they are and on whatever devices, now it brings an AI assistant to the party, taking it to the next level. It demonstrates how AI can enhance user interaction, data retrieval, and understanding in a complex system like BIM.
With the ability to understand natural language queries, fetch and process data from the Speckle server, and even dive into PDF attachments, the AI agent provides interaction and understanding beyond traditional user interfaces.
This is a win for Speckle and the BIM community, as it opens up new data interaction and exploration possibilities. It's an exciting step forward and a testament to the potential of AI in transforming the way we work with unlocked BIM data.
And let's not forget the real hero of the day, Jon Ryan, without whom this tutorial wouldn't have been thrust into life. Speckle Real-Time Commenting was already like a superhero, allowing you to explore a 3D model in multiplayer mode with others, wherever they are, on whatever devices. It's like a superhero with a super-powered AI sidekick named Spackle. It's a win for Speckle, the BIM community, and everyone who loves seeing AI and BIM come together. Who knows what amazing feats of coding and AI wizardry await us in the future?