A Simple Web Based Table View for Speckle Data
Create a VueJs application that displays Speckle data (coming from Revit) in a table component - build the schedules of the future in less than 200 lines of code!

Introduction
::: details Some Context - Flat Data vs. Structured Data
Data in Speckle is ultimately structured - not flat. Structure is as important as content, especially when you're dealing with complex abstractions such as a "Building", "Bridge" or even a humble "House". The way you articulate this structure represents your understanding of the problem, and is inherent in how you work.
:::
What Will You Build?
💻 Check the app live right here!
⭐️ Check out the code right here!
Speckle's current default way of viewing data online is a tree visualisation which you can explore interactively. Nevertheless, sometimes structured data gets in the way - especially if you try to answer questions such as "how many walls of this type do I have?". Pretty much any bill of materials or schedule, and all the associated workflows that they support, rely on flat data.
A nice part of Speckle is that you can access data in both ways:
- Flat: for queries, bill of materials, schedules, etc.
- Structured: for when you're dealing with modelling software and more advanced code-based workflows.
This tutorial will show you how to assemble a quick online Vue application that displays Speckle data (coming from Revit) in a table component. You will learn quite a few things:
- how to query via the GraphQL API to select specific elements only,
- how to get only the specific properties you're interested in,
- how to handle pagination of large datasets.
Source Code
All the code is in this repo. Give it a star and clone it locally. You should be able to get going with a simple few commands:
npm installto install dependenciesnpm run serveto spin up a local instance
Setting Up Vue
You will need to install the vue cli to follow along. It's really easy:
❯ npm install -g @vue/cli
Next, let's scaffold a new vue app. In the terminal of choice, go ahead and type vue create your-app-name and select the Default ([Vue 2] babel, eslint) preset.
❯ vue create table-demo
After the initialisation is done and all the npm packages are installed, it's time to add vuetify as our UI framework. It comes with a quite a few components that will make our life much easier.
First make sure you're inside your app folder. Once there, simply type on the terminal vue add vuetify and hit enter. Make sure you select the Default preset.
❯ cd table-demo
❯ vue add vuetify
To make sure everything works at this step, run npm run serve from your terminal. This will start a development server. If you open up http://localhost:8080 you should see something like this:
Your app's folder should look something like this:
❯ tree -I node_modules
.
├── README.md
├── babel.config.js
├── package-lock.json
├── package.json
├── public
│   ├── favicon.ico
│   └── index.html
├── src
│   ├── App.vue
│   ├── assets
│   │   ├── logo.png
│   │   └── logo.svg
│   ├── components
│   │   └── HelloWorld.vue
│   ├── main.js
│   └── plugins
│       └── vuetify.js
└── vue.config.js
The App
We can safely remove the default fluff that is already there when you initialise a vue app for the first time.
In this tutorial, we need to edit only two files, namely App.vue and the components/HelloWorld.vue.
App.vue Cleanup
Here's how App.vue should look like:
<template>
  <v-app>
    <v-app-bar app color="primary" dark>
      Hello Speckle!
    </v-app-bar>
    <v-main>
      <HelloWorld/>
    </v-main>
  </v-app>
</template>

<script>
import HelloWorld from './components/HelloWorld'

export default {
  name: 'App',
  components: {
    HelloWorld,
  }
};
</script>
HelloWorld.vue (The Table View!)
And let's now head over to the HelloWorld.vue component: we'll reuse this for the main application logic. Here's the main structure that we're going to fill in:
<template>
<!-- HTML Elements -->
</template>

<script>
// Vue Component Logic
</script>
Replace the whole contents of HelloWorld with the above. Next, we'll walk through step by step creating our tabular view inside.
The Layout
First off, what are the inputs? This being a technical demo, we can be a bit more straightforward:
- a text input box where an end-user can paste the url of the object we want to query,
- a number input box where we can specify how many "rows" to retrieve,
- another text input box where we can pass in the fields we want to retrieve,
- and a last text input box where we'll drop specific queries for the API.
Inside the <template> tags (in the HelloWorld.vue file) copy and paste this code:
<template>
  <v-container>

    <div class="mb-4">
      <v-text-field label="Object Url" v-model="url"></v-text-field>
      <v-text-field label="Limit" v-model.number="limit" type="number"></v-text-field>
      <v-text-field label="Select" v-model="select"></v-text-field>
      <v-text-field label="Query" v-model="query"></v-text-field>

      <v-btn elevation="2" color="primary" :loading='fetchLoading && !prevLoading && !nextLoading' @click="fetchChildren">Fetch</v-btn>
    </div>

    <p class="caption">Total count: {{totalCount ? totalCount : 'unknown'}}</p>
  </v-container>
</template>
It adds the input fields we've discussed above and a small paragraph to display the total count of objects our query returns (once we fetch the data in the next steps).
Next, we'll want to add a table view to display our data. Luckily, vuetify comes with a very powerful and flexible one already.
After the last <p> paragraph tag add the following:
<v-data-table :headers="headers" :items="flatObjs" :items-per-page="limit" hide-default-footer class="elevation-1 my-4"></v-data-table>
Some simple pagination buttons will also come in handy. They're easy to add:
<v-btn @click="prev" :loading='prevLoading' :disabled="cursors.length <= 2" class="mr-2">prev</v-btn>
<v-btn @click="next" :loading='nextLoading' :disabled="cursors.length === 0 || (cursors.length - 1) * limit >= totalCount" class="mr-2">next</v-btn>
If you got mixed up, expand the section below and copy and paste the complete code.
::: details Full HelloWorld.vue Template Code
Here's the full vue template code for:
<template>
  <v-container>

    <div class="mb-4">
      <v-text-field label="Object Url" v-model="url"></v-text-field>
      <v-text-field label="Limit" v-model.number="limit" type="number"></v-text-field>
      <v-text-field label="Select" v-model="select"></v-text-field>
      <v-text-field label="Query" v-model="query"></v-text-field>

      <v-btn elevation="2" color="primary" :loading='fetchLoading && !prevLoading && !nextLoading' @click="fetchChildren">Fetch</v-btn>
    </div>

    <p class="caption">Total count: {{totalCount ? totalCount : 'unknown'}}</p>

    <v-data-table :headers="headers" :items="flatObjs" :items-per-page="limit" hide-default-footer class="elevation-1 my-4"></v-data-table>

    <v-btn @click="prev" :loading='prevLoading' :disabled="cursors.length <= 2" class="mr-2">prev</v-btn>
    <v-btn @click="next" :loading='nextLoading' :disabled="cursors.length === 0 || (cursors.length - 1) * limit >= totalCount" class="mr-2">next</v-btn>

    <p class="caption mt-2">Curr items: {{ ( cursors.length - 1 ) * limit }} Cursor: {{cursors ? cursors : 'n/a'}}</p>

  </v-container>
</template>
:::
::: warning
Note, the app won't work yet, and will likely complain about quite a few things if you open up the console. That's because there's quite a few things missing, which we will cover in the next section.
:::
The Logic
The data section of the component will hold a bunch of variables that will keep track of our objects, pagination status and other things, such as loading states.
Here's how it looks like:
<template>
// We've filled this out above!
</template>
<script>
export default {
  name: 'HelloWorld',
  data() {
    return {
      url: 'https://speckle.xyz/streams/0d3cb7cb52/objects/f833afec2e17457f17e7f6429a106187',
      totalCount: null,
      query: '[{"field":"speckle_type","operator":"=","value":"Objects.BuiltElements.Wall:Objects.BuiltElements.Revit.RevitWall"}]',
      select: '["speckle_type","id","parameters.HOST_AREA_COMPUTED.value", "parameters.HOST_VOLUME_COMPUTED.value"]',
      cursors: [],
      flatObjs: [],
      headers: [],
      limit: 10,
      fetchLoading: false,
      prevLoading: false,
      nextLoading: false
    }
  },
  // ... more code to follow!
}
</script>
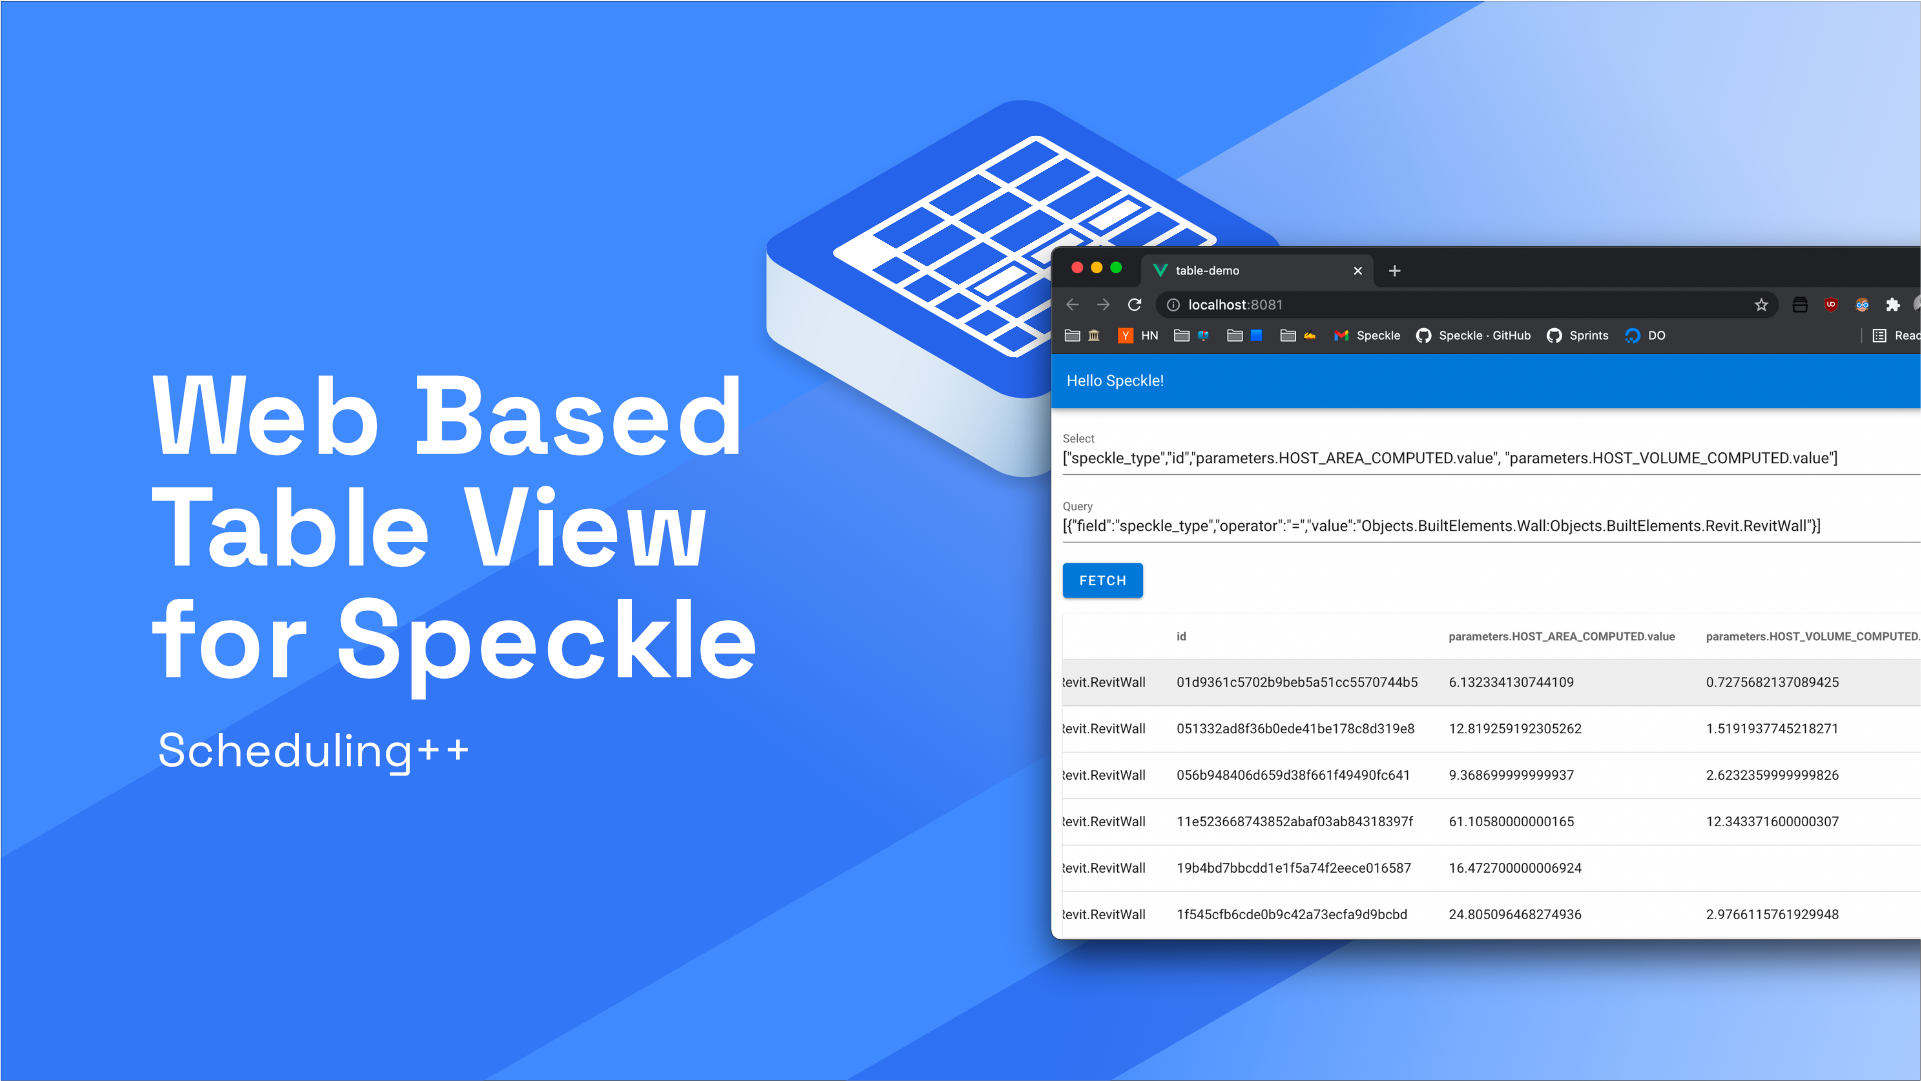
Once you've added these fields, your application should already render:
I've already populated the object url, select clause and query field with some default values that show off some functionality.
Querying the GraphQL API
To learn more about how to query Speckle's GraphQL API, look no further than our docs
GraphQL API | Speckle Docs
Documentation on everything Speckle
Speckle Docs
Fetching The Data From The API
To be able to show a JSON object in a table view, we will need to "flatten" it first. We need a small dependency that will help us to so, flat. Install it:
❯ npm install --save flat
All the following functions go inside the `methods` section of the vue component's logic handlers. Here's an overview of the structure:
// Import our dependency. Make sure it's outside the export default {} scope!
import flat from 'flat'

// Component logic
export default {
  // ...
}
There's two core functions that help us get data. The main one is async fetchChildren(). Here's how it looks and works:
async fetchChildren( cleanCursor = true, cursor = null, appendCursor = true ) {

      // Parse the object's url and extract the info we need from it.
      const url = new URL( this.url )
      const server = url.origin
      const streamId = url.pathname.split( '/' )[2]
      const objectId = url.pathname.split( '/' )[4]

      // Get the gql query string.
      const query = this.getQuery( streamId, objectId, cursor )

      // Set loading status
      this.fetchLoading = true

      // Send the request to the Speckle graphql endpoint.
      // Note: The limit, selection and query clause are passed in as variables.
      let rawRes = await fetch( new URL( '/graphql', server ), {
        method: 'POST',
        headers: {
          'Content-Type': 'application/json'
        },
        body: JSON.stringify( {
          query: query,
          variables: {
            limit: this.limit,
            mySelect: this.select ? JSON.parse( this.select ) : null,
            myQuery: this.query ? JSON.parse( this.query ) : null
          }
        } )
      } )

      // Parse the response into.
      let res = await rawRes.json()

      let obj = res.data.stream.object

      this.totalCount = obj.children.totalCount

      // Cursor management.
      if( cleanCursor ) this.cursors = [ null ]
      if( appendCursor ) this.cursors.push( obj.children.cursor )

      // Flatten the objects!
      this.flatObjs = obj.children.objects.map( o => flat( o.data, { safe: false } ) )

      // Create a unique list of all the headers.
      const uniqueHeaderNames = new Set()
      this.flatObjs.forEach( o => Object.keys( o ).forEach( k => !k.includes( '__closure' ) ? uniqueHeaderNames.add( k ) : null ) )

      this.headers = []
      uniqueHeaderNames.forEach( val => this.headers.push( { text: val, value: val, sortable: false } ) )

      // Last, signal that we're done loading!
      this.fetchLoading = false
    },
The getQuery() function is a simple wrapper around a big string literal - it basically helps us generate the right gql query based on some inputs:
getQuery( streamId, objectId, cursor = null ) {
      return `
        query( $limit: Int, $mySelect: [String!], $myQuery  [JSONObject!]) {
          stream( id: "${streamId}" ) {
            object( id: "${objectId}" ) {
              data
              children(
                limit: $limit
                depth: 100
                select: $mySelect
                query: $myQuery
                ${ cursor ? ', cursor:"' + cursor + '"' : '' }
                ) {
                totalCount
                cursor
                objects {
                  id
                  data
                }
              }
            }
          }
        }
      `
    }
Copy and paste the two methods above inside the methods block of the vue component.
// Import our dependency. Make sure it's outside the export default {} scope!
import flat from 'flat'

// Component logic
export default {
  data() { ... },
  // Copy paste in here the two methods above:
  methods: {
  	async fetchChildren( cleanCursor = true, cursor = null, appendCursor = true ) { ... },
    getQuery( streamId, objectId, cursor = null ) { ... }
  }
}
Pagination
Two last functions need to be added:
async prev()for going backward,async next()for going forward.
async next() {
  this.nextLoading = true
  await this.fetchChildren( false, this.cursors[ this.cursors.length - 1 ] )
  this.nextLoading = false
},
async prev() {
  this.prevLoading = true
  await this.cursors.pop() // remove last cursor
  await this.fetchChildren( false, this.cursors[ this.cursors.length - 2 ], false ) // fetch using the second last cursor
  this.prevLoading = false
},
Put those two methods right next to the other ones!
Tada! Your tabular view should now be 100% functional, just click on the big blue fetch button and you'll get a bunch of walls.
If you followed so far, and something isn't working, just copy paste the whole code below in your HelloWorld.vue component file.
::: details Full HelloWorld.vue code
<template>
  <v-container>

    <div class="mb-4">
      <v-text-field label="Object Url" v-model="url"></v-text-field>
      <v-text-field label="Limit" v-model.number="limit" type="number"></v-text-field>
      <v-text-field label="Select" v-model="select"></v-text-field>
      <v-text-field label="Query" v-model="query"></v-text-field>

      <v-btn elevation="2" color="primary" :loading='fetchLoading && !prevLoading && !nextLoading' @click="fetchChildren">Fetch</v-btn>
    </div>

    <p class="caption">Total count: {{totalCount ? totalCount : 'unknown'}}</p>

    <v-data-table :headers="headers" :items="flatObjs" :items-per-page="limit" hide-default-footer class="elevation-1 my-4"></v-data-table>

    <v-btn @click="prev" :loading='prevLoading' :disabled="cursors.length <= 2" class="mr-2">prev</v-btn>
    <v-btn @click="next" :loading='nextLoading' :disabled="cursors.length === 0 || (cursors.length - 1) * limit >= totalCount" class="mr-2">next</v-btn>

    <p class="caption mt-2">Curr items: {{ ( cursors.length - 1 ) * limit }} Cursor: {{cursors ? cursors : 'n/a'}}</p>
  </v-container>
</template>

<script>
import flat from 'flat'

export default {
  name: 'HelloWorld',
  components: {},
  data() {
    return {
      url: 'https://speckle.xyz/streams/0d3cb7cb52/objects/f833afec2e17457f17e7f6429a106187',
      totalCount: null,
      query: '[{"field":"speckle_type","operator":"=","value":"Objects.BuiltElements.Wall:Objects.BuiltElements.Revit.RevitWall"}]',
      select: '["speckle_type","id","parameters.HOST_AREA_COMPUTED.value", "parameters.HOST_VOLUME_COMPUTED.value"]',
      cursors: [],
      flatObjs: [],
      headers: [],
      limit: 10,
      fetchLoading: false,
      prevLoading: false,
      nextLoading: false
    }
  },
  watch: {
    limit() {
      // If the limit is changed, we need to reset the query
      this.fetchChildren()
    }
  },
  methods: {
    async next() {
      this.nextLoading = true
      await this.fetchChildren( false, this.cursors[ this.cursors.length - 1 ] )
      this.nextLoading = false
    },
    async prev() {
      this.prevLoading = true
      await this.cursors.pop() // remove last cursor
      await this.fetchChildren( false, this.cursors[ this.cursors.length - 2 ], false ) // fetch using the second last cursor
      this.prevLoading = false
    },

    async fetchChildren( cleanCursor = true, cursor = null, appendCursor = true ) {

      // Parse the object's url and extract the info we need from it.
      const url = new URL( this.url )
      const server = url.origin
      const streamId = url.pathname.split( '/' )[2]
      const objectId = url.pathname.split( '/' )[4]

      // Get the gql query string.
      const query = this.getQuery( streamId, objectId, cursor )

      // Set loading status
      this.fetchLoading = true

      // Send the request to the Speckle graphql endpoint.
      // Note: The limit, selection and query clause are passed in as variables.
      let rawRes = await fetch( new URL( '/graphql', server ), {
        method: 'POST',
        headers: {
          'Content-Type': 'application/json'
        },
        body: JSON.stringify( {
          query: query,
          variables: {
            limit: this.limit,
            mySelect: this.select ? JSON.parse( this.select ) : null,
            myQuery: this.query ? JSON.parse( this.query ) : null
          }
        } )
      } )

      // Parse the response into.
      let res = await rawRes.json()

      let obj = res.data.stream.object

      this.totalCount = obj.children.totalCount

      // Cursor management.
      if( cleanCursor ) this.cursors = [ null ]
      if( appendCursor ) this.cursors.push( obj.children.cursor )

      // Flatten the objects!
      this.flatObjs = obj.children.objects.map( o => flat( o.data, { safe: false } ) )

      // Create a unique list of all the headers.
      const uniqueHeaderNames = new Set()
      this.flatObjs.forEach( o => Object.keys( o ).forEach( k => !k.includes( '__closure' ) ? uniqueHeaderNames.add( k ) : null ) )

      this.headers = []
      uniqueHeaderNames.forEach( val => this.headers.push( { text: val, value: val, sortable: false } ) )

      // Last, signal that we're done loading!
      this.fetchLoading = false
    },

    getQuery( streamId, objectId, cursor = null ) {
      return `
        query( $limit: Int, $mySelect: [String!], $myQuery: [JSONObject!]) {
          stream( id: "${streamId}" ) {
            object( id: "${objectId}" ) {
              data
              children(
                limit: $limit
                depth: 100
                select: $mySelect
                query: $myQuery
                ${ cursor ? ', cursor:"' + cursor + '"' : '' }
                ) {
                totalCount
                cursor
                objects {
                  id
                  data
                }
              }
            }
          }
        }
      `
    }
  }
}

</script>
:::
Last Words
So, if you've followed so far, you've learned quite a bit from a simple "display data in an online table" exercise! You now understand:
- the two main ways of dealing with data in Speckle, flat vs. structured
- you've created a simple vue app that displays the volume and area of all the walls in Speckle commit,
- and you've learned how to sustainably trawl large data sets with pagination.
And don't forget to ⭐️ this repository for future updates!
We're very curious what you'll do next; and, of course, we're standing by if you need any help - just ping us on the forum 🖖
Subscribe to Speckle News
Stay updated on the amazing tools coming from the talented Speckle community.


