Collaborative Data Informed Design Workflows With Rhino and Grasshopper
In this tutorial, we're going to create a simple collaborative workflow with Rhino, Grasshopper and Speckle. We're assuming a design process in which three (or more) persons are collaborating on the design of a market hall.

Prerequisites
To follow along with this tutorial, you will need to register with Speckle and install the required connectors 🔌. It takes less than 3 minutes!
For a comprehensive overview of these connectors, check our docs 📚!
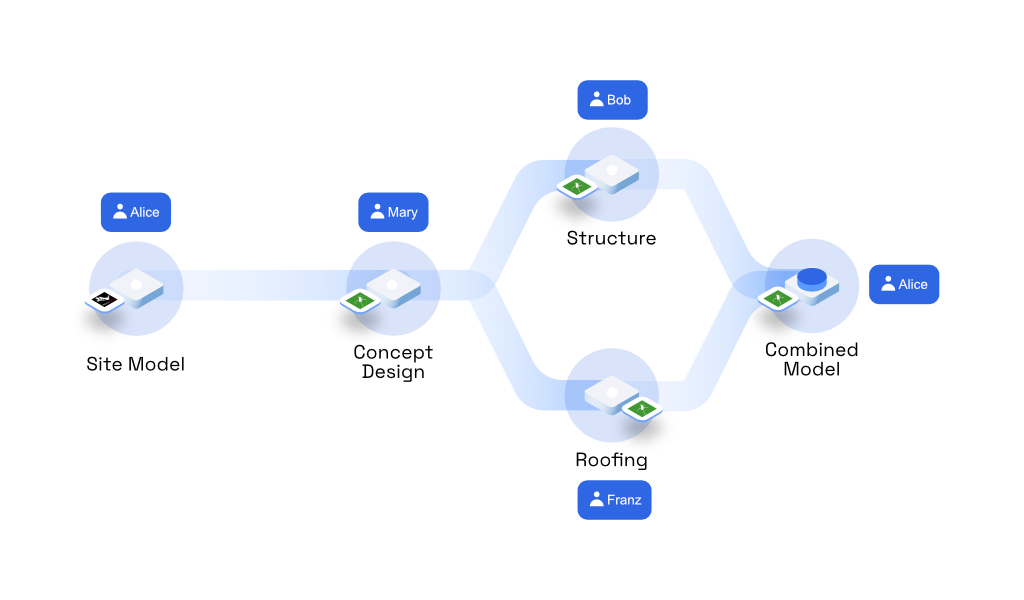
Here is a diagram of the workflow:
Curious about the final result?
Check the model out here, or load it up below ⬇️
If you're tired of reading things, you can find a video tutorial down below. We use a different sample model, but the principles are the same!
Otherwise, just skip it and follow along here.
How are we going to structure this? Simple! First off, we're going to create a new stream with four separate branches that can match four different sections of a typical design process. Each colleague will be pushing their data to one of these branches:
- Site Branch (Alice - Project Manager)
- Concept Branch (Mary)
- Structure Branch (Bob)
- Roofing Branch (Franz)
Alice, our project manager, will use the default branch, "main" to hold the combined data. This 'canonical' branch can be seen as representing the "official" state of the model, free from whatever goes on in other branches.
Here's a quick video of how to set up this stream:
::: warning Want to follow along?
The base files are right here.
Please Note: You will not be able to send to the same stream as the one we're using, as you don't have write access to it. You can just create one on our server and get going!
:::
Step 0: Sending the Site & Surroundings to Speckle
We'll assume the site is modelled in Rhino directly. Consequently, Alice will use the Rhino connector to send the data out. To open it in Rhino, simply type Speckle in the command line.
In this step, Alice is just sending "everything" out that's in the file. You might want to curate what you send, but it's the easiest option. To do so, first add the stream you have just created to the connector. Then swap it to a sender, and set its object filter to "All". Finally, Alice hits Send!
Here's how the site looks like in your browser.
Step 1: Conceptual Modelling
Before starting to work on her concept design, Mary first pulls in the site information that Alice is keeping updated on the "site" branch.
As she wants to always have the latest version of the site model, Mary selects the "latest" option in the receiver rather than specifying an individual commit. This means that whenever Alice will update the site information, she will be notified of the change in real-time!
Mary's Grasshopper definition takes a surface and cuts it into three main sections, creating a flowing roof-like structure describing three separate market halls. We've kept the design part rather brief for the purposes of this tutorial 😇
When sending the data out, Mary is organising it a bit, rather than just "sending it". She discussed with Bob and Franz how best to prepare it for them to use "down the line". When devising a structural system (for Bob) and the roofing solution (for Franz) they decided to separate the generator curves from the actual surfaces. Mary does this by creating and nesting a series of custom speckle objects that describe each hall section:
TIP: When plugging data directly into a Grasshopper sender and receiving it back out again, Speckle respects your tree structures; that might be enough!
Lastly, Mary sends her work in the "concept" branch. In Grasshopper, the easiest way to do this is to simply copy paste the branch URL from the Speckle Web App and plug it into the "S" input port of the sender node.
Step 2: Structural Design
Bob will now start designing a structure for the market halls. To start, he will receive the surfaces from the conceptual modelling branch. Here's a quick video of the process:
Notice how when Bob just received the data, there's no visible geometry. That's because it comes from upstream in a custom structure that needs to be expanded first to reach the actual geometry.
Great! Now Bob has a bunch of generator curves, as well as the original surfaces of the roof. From here onwards, we can start designing our structure! Once done, Bob sends his structural design to the "structure" branch of the stream.
Want to actually see what's going on?
Check out Bob's (ahem, Dim's) latest commit!
Step 3: Creating the Roof
Franz is tasked with coming up with a cladding solution for our design. For this, he need to receive both the structure, as well as the original surfaces. Franz can easily receive the data from both the conceptual modelling branch, as well as from the structural branch - and based on that, start creating different cladding versions. He just creates two receivers, one for the "concept" branch and one for the "structure" branch.
Franz comes up with cladding design that's reliant on several species of wood, all with different nuances. To communicate this, he adds custom render materials to each individual panel to reflect the intention he's going for.
Extending Speckle Objects: Colours & More!
Moreover, he attaches a field to each panel's geometry containing a string that describes the wood type. How does he do the above? It's quite simple!
First, he converts each panel to a Speckle object. Then, using the Extend Speckle Object component, he adds two separate fields - one called renderMaterial (he populates this using by generating a render material object using the Schema builder component - this will be picked up by the online renderer) and another one, called woodSpeciesType, which he populates with the name of the wood for each panel.
Step 4: Bringing It All Together
Merging Data
Alice, our project manager, is in charge of this stage of the project. As such, she will want to verify and release data down the line before it goes out to other contractors or different teams.
Her main task is to coordinate and merge the data from the structure, roofing and the site branches and push it to main, where it can be easily referred to in the future. How does she do that? Well, there's more than one way! She could receive and bake all the data streams in Rhino, check that they are in good order, and then send them out again.
Alternatively, she can also receive all this data in Grasshopper and merge it there before sending it out to the main branch:
Using the online interface, Alice will assign that commit a specific "commit message", or description, that matches the project's delivery naming conventions and specifications. Here's how to do it:
Check out the final result here: https://speckle.xyz/streams/a632e7a784/commits/a4427aede3
Updates
As you know, things can change during the design phase. One nifty advantage of using Speckle is that you can have real-time updates as soon as they are sent!
Each receiver will notify users when there's a newer commit on a given branch. Moreover, if set to "auto-receive" mode, the connector will automatically pull that data down! Here's a quick video of a live-update session:
Note: Sometimes it's better not to have live updates. I mean, who would want to publish design data out before it's ready? That's why the default behaviour of Senders and Receivers is set to "manual" - publish data when you're ready drafting and pull new data in at your leisure!
Key Takeaways
This quick tutorial taught you one of the ways in which you can use Speckle in a collaborative design environment in Rhino and Grasshopper.
- You've become familiar with the basics of the Rhino and Grasshopper connectors, and some advanced features such as adding custom properties to objects.
- You've used stream branches to separate the design tasks amongst a team of architects and engineers.
- You've also seen how to structure data so that downstream actions can be easier to achieve.
- Lastly, you've merged multiple data sources to create a master model to "pin" a version of your design.
Conclusion
We hope you enjoyed this tutorial and found it useful!
Speckle is an Open Source project and we really ❤️ feedback, so if you have any questions, comments, critiques, or praises please let us know on our community forum.
Subscribe to Speckle News
Stay updated on the amazing tools coming from the talented Speckle community.


