
Tekla Structures is a popular BIM engineering software for fabricators. We hope that with the release of this connector, that BIM technicians and fabricators will be empowered to automate more of their tedious workflows. Let's look at how you can use Speckle to get data in and out of Tekla Structures and supercharge your productivity!
Currently, this connector is under alpha release which means there is limited functionality to what it can do and is not as comprehensive as other connectors. We hope that this alpha release is enough for BIM technicians and fabricators to get started with building some of their workflows though.
For a comprehensive overview of this connector, check our docs 📚!
Prerequisites
To follow this tutorial you'll need the following:
- Tekla Structures 2020 or 2021
- a Speckle account (you can get one at https://speckle.xyz/)
- the Speckle Connector for Tekla Structures (see below, install it via Manager)
Installation
Installing the connector is as simple as finding it in the list of available connectors in Speckle Manager and clicking "Install"!
::: warning
If you get this error after installation, don't worry ! It's normal !
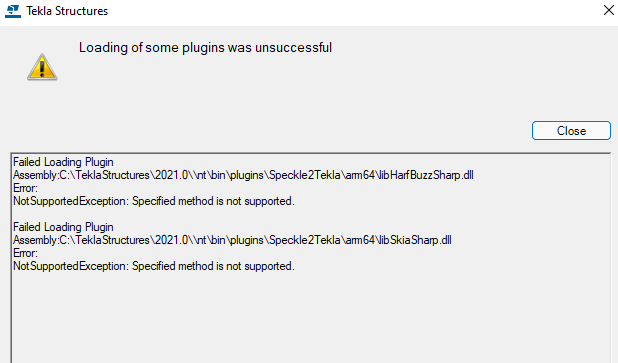
:::
Launching the Connector
The connector will be added to all supported versions of Tekla Structures that you have installed.
To launch the connector, navigate to the "Tools" in the toolbar. There you'll find the Speckle Connector button.
Adding or Creating a Stream
Adding a stream to your Tekla Structures project takes just three easy steps.
- Click the create new stream
- You'll see a popup with a text box prompting for a new stream
- Add a description
You can also add streams by their URL by using the URL button next to the connector. The Add stream tab will list all the streams associated with the accounts you have linked to the manager. You can navigate between accounts on the desktop UI.
Sending from Tekla Structures
Sending Using Filters
Instead of manually selecting the objects you want to add to the stream, you can use filters to select the objects for you. The connector includes a number of categories.
To apply a filter:
Click the category options that you want to send, then click send and check out your filtered data on the web. You can send again to the same stream by clicking the send button again.
Receiving in Tekla Structures
Before you receive data into the Tekla Structures model. Save the Tekla Structures file first if it's an empty model.
Receiving data into Tekla Structures is even easier. Make sure your stream card is in receive mode. If it isn't, change it to the receive mode with the tab. If you want to receive from another stream, you can go back to the Add Stream tab and navigate to an appropriate stream to choose to receive from.
If you want to receive older data, you can use the change the commit that says "latest" to choose an older send. If you have multiple branches on the stream, you can use the branch category to switch between branches.
If you want more detailed info on the Tekla Structures connector, head over to this page on speckle.guide!
Conclusion
We hope you enjoyed this tutorial and found it useful!
Speckle is an Open Source project and we really ❤️ feedback, so if you have any questions, comments, critiques, or praises please let us know on our community forum.