Complete guide to using Speckle in Grasshopper
This comprehensive tutorial covers how to effectively use Speckle within Grasshopper for parametric design workflows, focusing on loading, querying, editing, and publishing BIM data and 3D models.
Prerequisites
Before starting, ensure you have:
- A Speckle account
- Speckle connector for Rhino/Grasshopper downloaded and installed
- Rhino 3D installed on your computer
- Good working knowledge of Grasshopper (this tutorial assumes intermediate Grasshopper skills)
Overview: Three core stages
Working with Speckle in Grasshopper involves three distinct stages that form a complete workflow:
- Loading - Bringing Speckle models into Grasshopper
- Querying & Editing - Augmenting and modifying the loaded data
- Publishing - Sending modified data back to Speckle
Stage 1: Loading Speckle models into Grasshopper
There are three methods to load Speckle models into Grasshopper, each suited for different workflows:
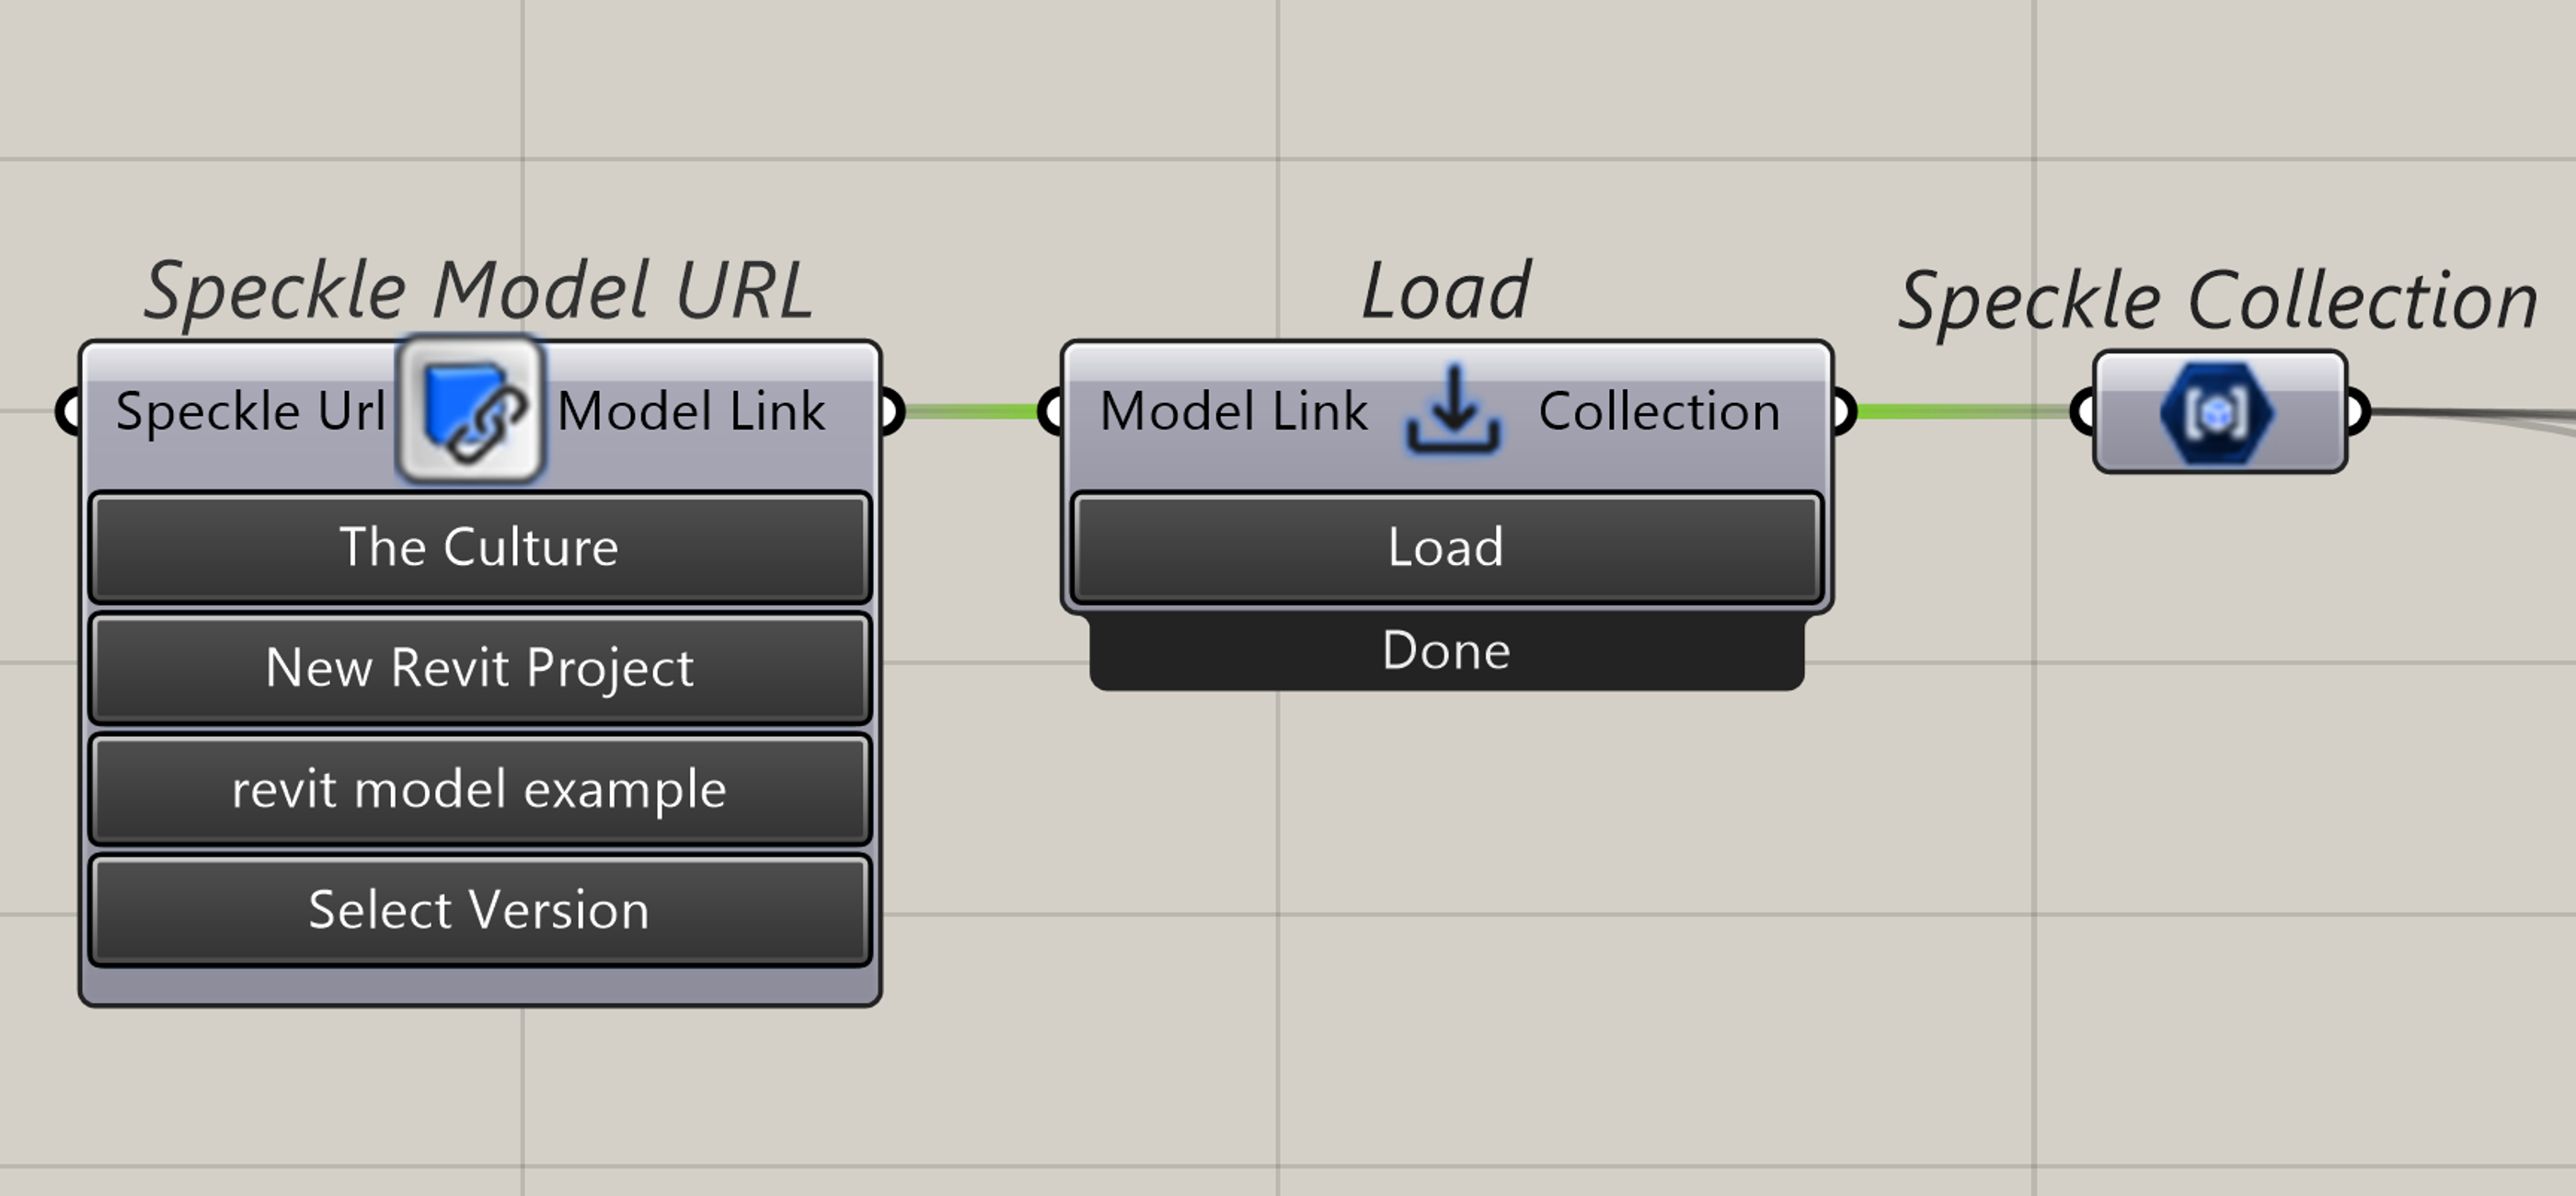
Method 1: Manual loading with Speckle model URL node
Best for: One-time loads and controlled data updates
- Add the Speckle Model URL node to your Grasshopper definition
- Select your workspace from the first dropdown (most users will have only one workspace)
- Choose your project from the available projects in your workspace
- Select the specific model you want to load from within that project
- Pick a version - the node defaults to the latest version
- Connect to a Load node
- Click "Load"
Method 2: Direct URL input
Best for: Sharing definitions or working with specific model links
- Pass a Speckle model URL directly into the Speckle Model URL node
- The node will automatically parse the URL and make it compatible with the Load node
- This method still requires manual clicking of the Load button

Stage 2: Understanding and querying Speckle data
Speckle collections
When a model loads into Grasshopper, it arrives as a Speckle Collection - Speckle's universal way of handling layer structures across different software platforms.
Why Collections Matter: Different software handles layers differently (Rhino has layers, Revit doesn't), so Speckle Collections provide a standardised layer-like structure that works across all platforms.
Exploring data structure
Using expand collection node
- Connect the Expand Collection node to see the hierarchical structure
- View parent-child relationships in your model's organization
- Understand how your specific model is structured (e.g., Revit models typically organise by levels)

Advanced querying techniques
Regex-based collection filtering
Use the Collection Selector node for powerful filtering: “?Door”
This simple regex pattern filters to show only collections containing "Door" in their name.
Important Notes:
- Regex queries are case-sensitive
- This opens up complex filtering possibilities (covered in future tutorials)
- Results automatically feed into Query Objects for immediate use

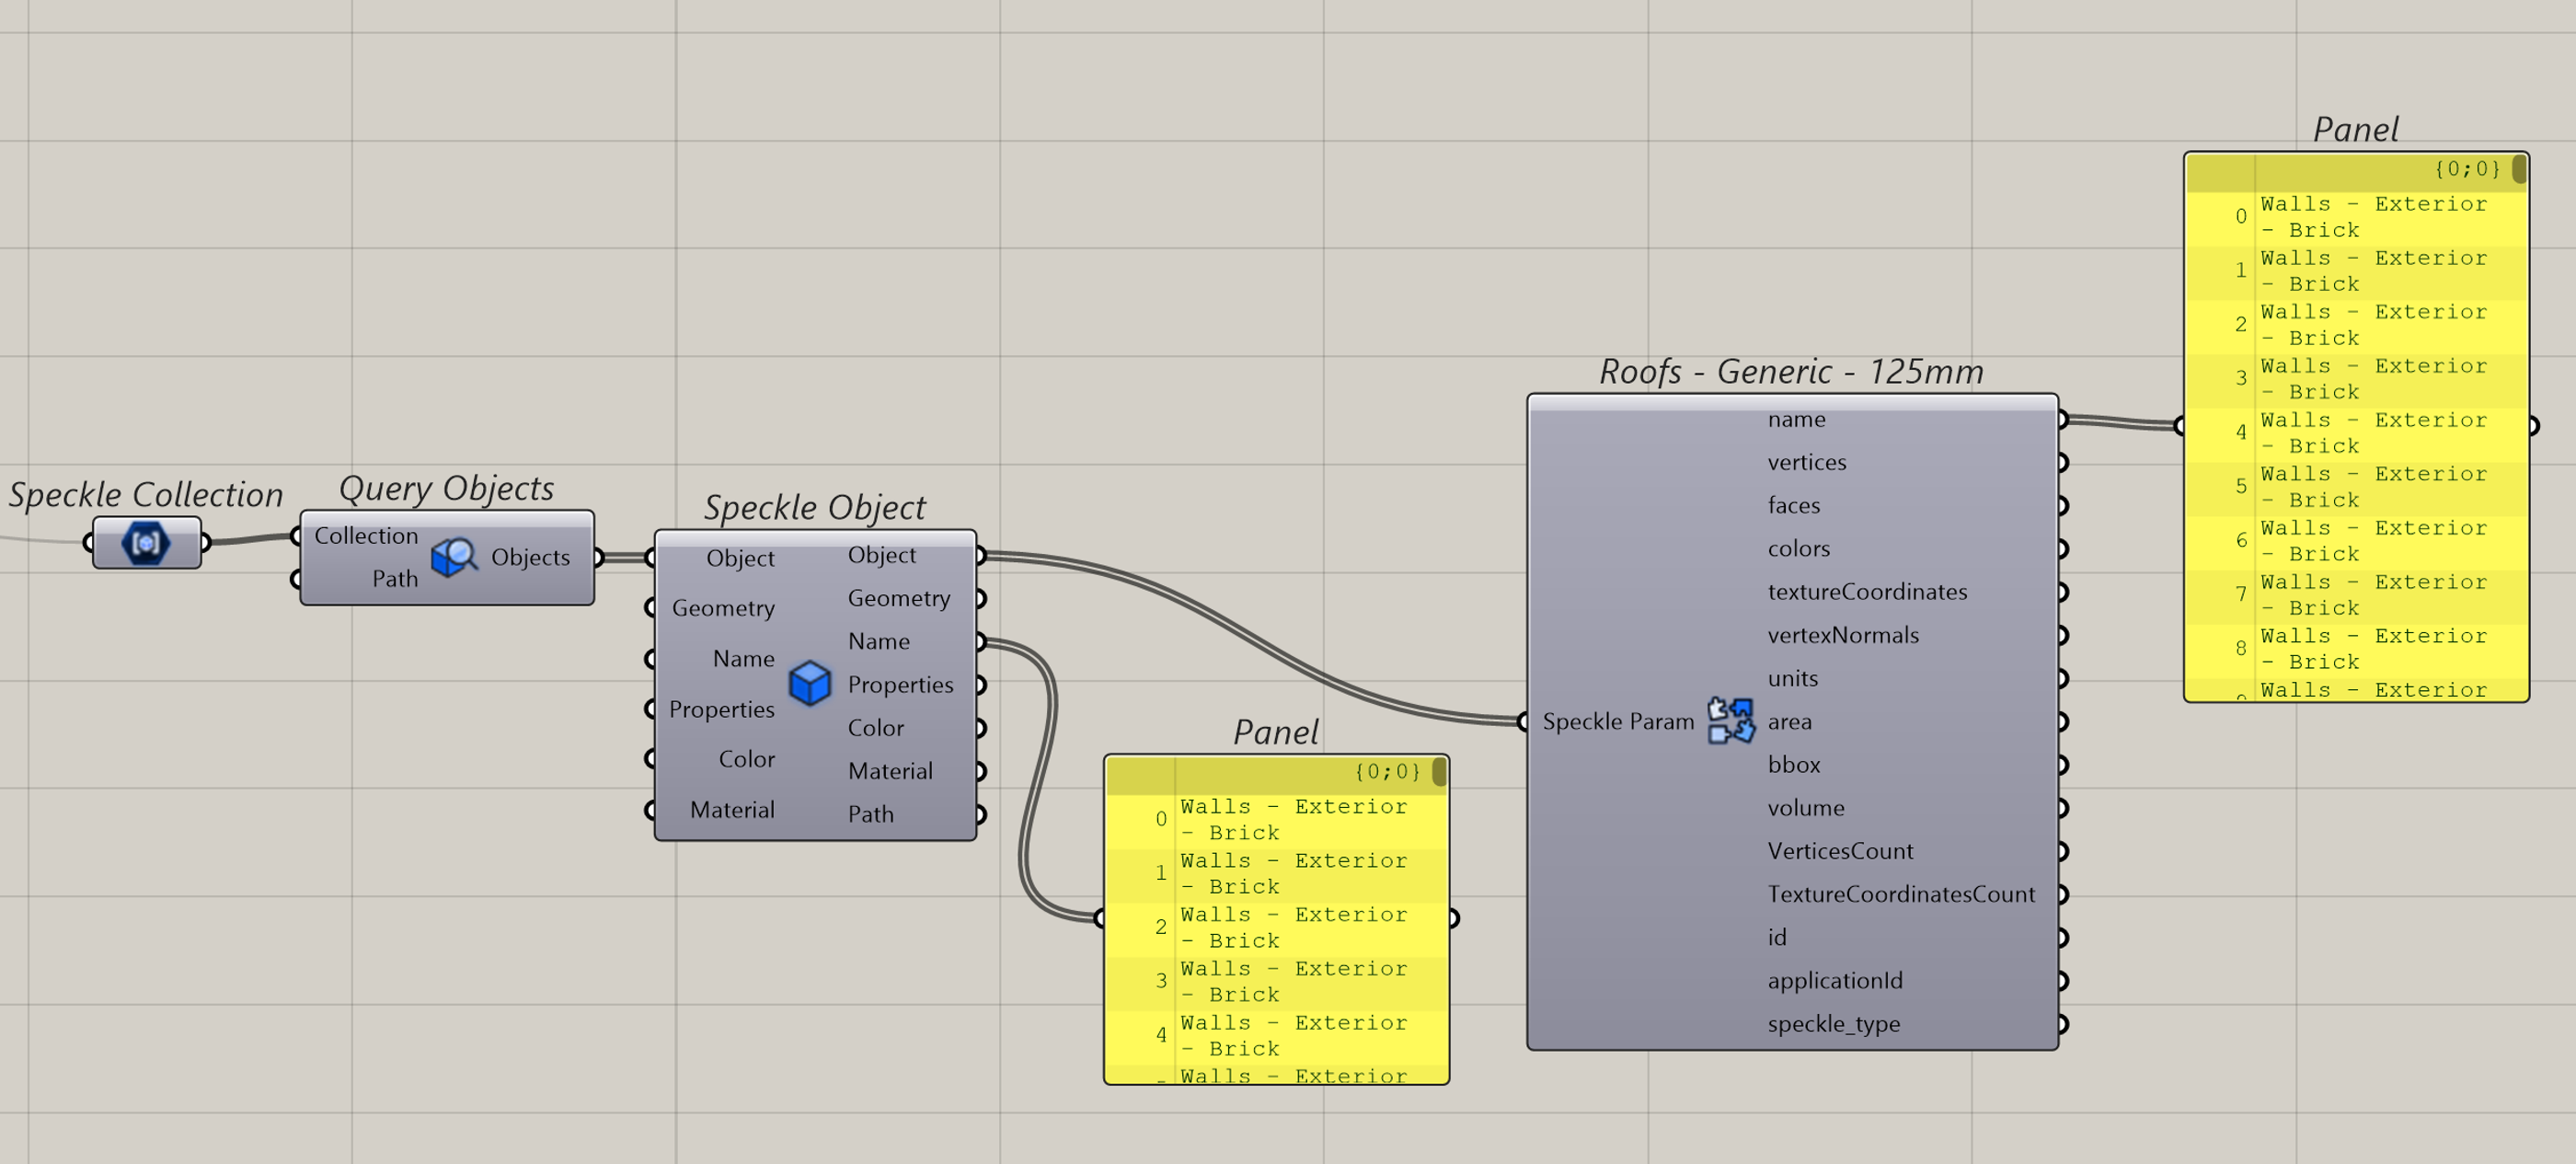
Breaking down collections
- Use the Query Objects node to break collections into individual Speckle objects
- Each Speckle object represents a single piece of geometry with its associated properties
- Connect panels to visualize the data flow and understand what you're working with
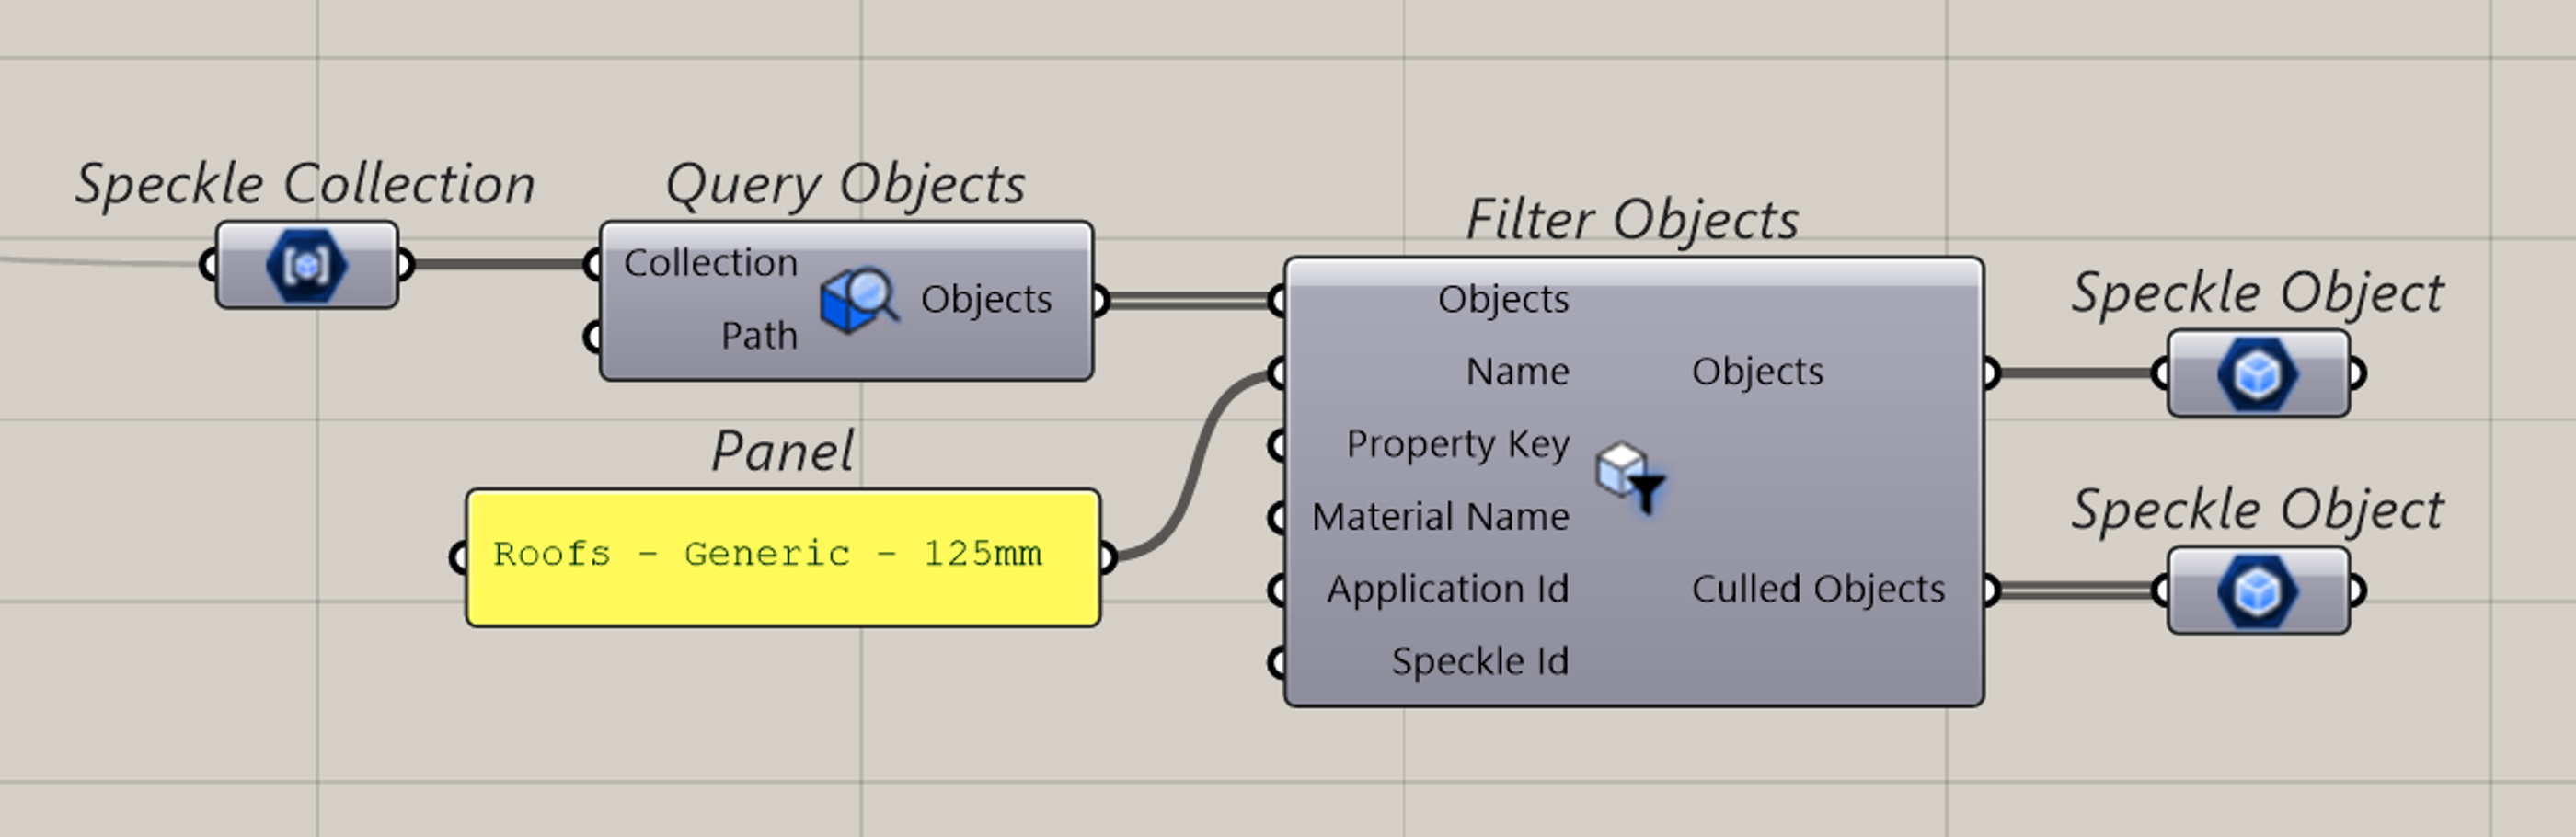
Object name filtering
Use the Filter Objects node to split objects by specific criteria:
- Input your Speckle collection broken down into objects
- Enter the exact name of components you want to isolate
- Get two outputs: objects that match your criteria and those that don't
- Use for quick object categorization and list management
Property-based querying
For advanced filtering based on object properties:
- Use Property Selector with regex to find specific property types (e.g., "description")
- Connect to Query Properties to extract actual property values
- Use standard Grasshopper logic (Match Text, Cull Pattern) to filter based on property values
- Example workflow: Filter all objects with "tree" in their description property

Stage 3: Editing and Publishing Data
Modifying Speckle Objects
Adding custom properties
- Use the Speckle Object node to create modified objects
- Add new properties by naming inputs (the input name becomes the property name)
- Zoom in and click the plus sign to add additional properties
- Example: Add "Answer" property with value "42" and change color to pink
Reconstructing collections
Before publishing, you must rebuild the collection structure:
- Use Create Collection node to group modified objects
- Add multiple collections by zooming in and clicking the plus sign
- Name your inputs carefully - input names become collection names in Speckle
- This reverses the deconstruction process performed during loading

Publishing method
Best for: Controlled updates and review workflows
- Use Speckle Model URL node to specify destination
- Connect to Publish node
- Click "Publish" when ready to upload changes
- Provides full control over when data is updated

Key workflow pattern
The deconstruct-modify-reconstruct pattern
This is the fundamental pattern for working with Speckle data in Grasshopper:
- Deconstruct: Collection → Objects → Properties
- Modify: Edit objects, add properties, change geometry
- Reconstruct: Objects → Collection → Publish
Best practices
Performance considerations
- Use manual loading/publishing for large models to control network usage
- Be cautious with automatic sync - understand when your definition recomputes
- Test with smaller datasets before scaling up to complex models
Data management
- Understand your source model structure before querying
- Use descriptive names for collections and properties
- Maintain clear data flow in your Grasshopper definitions
Collaboration
- Share Grasshopper definitions along with Speckle model URLs for team workflows
- Use version control in Speckle to track model iterations
- Document your property additions for team understanding
Advanced applications
This workflow enables powerful parametric design scenarios:
- BIM Data Analysis: Extract and analyze building information for design optimization
- Automated Design Validation: Check models against design criteria
- Cross-Platform Collaboration: Bridge between different design software
- Custom Property Addition: Enrich models with analysis results or design parameters
- Iterative Design Workflows: Rapidly test and share design variations
Conclusion
Speckle's integration with Grasshopper creates a powerful platform for parametric design workflows that can interact with BIM data and collaborate across different software platforms.
By mastering the three core stages - loading, querying/editing, and publishing - you can create sophisticated workflows that bridge the gap between parametric design and building information modeling.
The key to success is understanding Speckle's data structure (Collections and Objects) and following the deconstruct-modify-reconstruct pattern for data manipulation.
With these fundamentals in place, you can build complex, collaborative parametric design workflows that leverage the best of both Grasshopper's computational design capabilities and Speckle's collaborative platform.
Your ultimate parametric design hack.