

In this tutorial, we'll learn how to use webhooks to build our own integrations! We'll be building a simple Discord integration that will send messages to a channel when events occur on your Speckle Server. You could do the same thing for Slack or any other messaging platform with an API for sending messages - simply adapt the code here by referring to the docs of the platform to format your message accordingly.
There are two components to setting up a webhook integration. The first part involves creating your stream webhook and choosing what events should trigger it. The second part is setting up a server to receive and handle the webhook requests.
The stream webhooks documentation can be found here.
::: tip TL;DR 📚
If you want to skip the tutorial and get right to the code, you can clone the repo of the finished project here. All you'll need to do is fill in your environment variables, create your webhooks on a Speckle Server, and have fun 😎
:::
Prerequisites
This tutorial assumes that you have already set up a speckle account (on your own server or our public server).
In addition, we will be setting up a local server to receive and handle the requests from the Speckle Server. We'll be using ngrok to expose our local server to the internet. ngrok is free and can be downloaded from their website.
We'll be using Python to create the local server and handle the webhook requests. Basic knowledge of Python is assumed, though this tutorial is not very Python specific and can be adapted to use a different language if you'd prefer.
Setting Up A Stream Webhook
A webhook can be set up on any stream where you have the access level owner. You receive this role when you create a stream or if another stream owner assigns it to you.
On the sidebar of a stream, you'll find a "⚙ Settings" button. Click this and head to the "Webhooks" tab to set up your first webhook.
There are a few different fields to fill out when setting up a webhook:
- URL: This is where the requests are
POSTed when the webhook is triggered - Description: Optional text to help you identify the webhook
- Secret: An optional token that will help you verity that messages are actually coming from the Speckle Server. Requests will be secured with an
X-WEBHOOK-SIGNATUREwhich you can verify upon receiving. - Triggers: Select the events you want to trigger the webhook to send requests to the URL
- Enabled: Toggle whether or not messages will be sent when the webhook is triggered
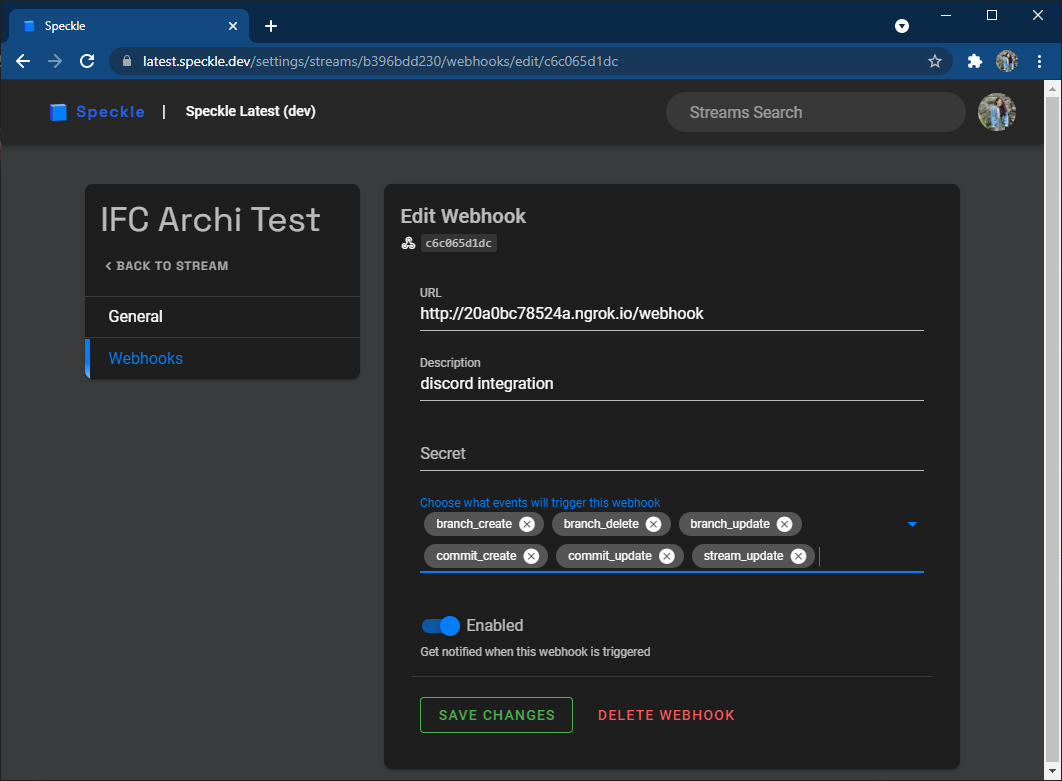
In our case, we'll be starting up a simple local server to receive the webhook requests. For this to work, we'll need to expose our local environment to the internet. We can do this with a simple command via ngrok. Let's expose our local port 8003:
ngrok http 8003
You should then see a response similar to the following:
Forwarding http://20a0bc78524a.ngrok.io -> http://localhost:8003
Paste the ngrok.io URL with /webhook at the end into the URL field in the webhook settings as shown in the screenshot above. Click "Save Changes" to confirm and add the webhook.
Listening To Webhook Requests
::: tip
As of the 2.12 server release, the webhook payload structure has changed slightly. Please refer to this post on how to correctly deserialise the payload:
 gjedlicska
:::
Let's start by setting up a bare-bones server to simply receive the webhook requests from the Speckle Server and print out the payload in the console.
To start, set up your environment, install cherrypy, and copy code below into a run.py file at the root of your directory.
::: details not sure how?
On Windows you can run the following to create and activate your virtual environment. For convenience, simply sub in venv for the venv-name. Use the activate script to start the venv.
$ python -m venv {venv-name}
$ {venv-name}\Scripts\activate
You can then pip install cherrypy to install cherrypy.
:::
The WebhookServer class is our simple server with a single endpoint webhook. The webhook endpoint grabs a request's payload and signature (secret). It then calls the webhook_called function which verifies if the signature is a match and prints out the payload to the console.
import cherrypy
import requests
import json
import hmac

# It's not a good practice to hardcode the secret or the URL. It's best to get it from an environment variable.
# See the finished project for an example.
SECRET = 'secret'
DISCORD_URL = ''


# Web server:
class WebhookServer(object):
    @cherrypy.expose
    @cherrypy.tools.json_in()
    def webhook(self, *args, **kwargs):
        payload_json = cherrypy.request.json.get('payload', '{}')
        signature = cherrypy.request.headers['X-WEBHOOK-SIGNATURE']
        self.webhook_called(payload_json, signature)

	# This function will be called each time the webhook endpoint is accessed
	def webhook_called(self, payload_json: str, signature: str):
		expected_signature = hmac.new(SECRET.encode(), payload_json.encode(), 'sha256').hexdigest()
		if not hmac.compare_digest(expected_signature, signature):
			print('Ignoring request with invalid signature')
			return
		payload = json.loads(payload_json)
		print('Received webhook payload:\n' + json.dumps(payload, indent=4))

cherrypy.config.update({
    # TODO: uncomment the following line after finishing development
    # 'environment': 'production',
    'server.socket_host': '0.0.0.0',
    'server.socket_port': 8003
})

# start the server
cherrypy.quickstart(WebhookServer())
Run the run.py file to start the server. Tada! You've now set up a server to receive the webhook requests from Speckle. Continue to the next section where we'll have a look at the request payload and extract the data needed for our Discord integration.
::: tip NOTE
You'll see that in the config we've chosen to run on port 8003 which is the port we exposed using ngrok. You can change this to something else if you wish; just remember to expose the right port with ngrok and use the correct URL when setting up the webhook on your stream.
:::
Handling the Webhook Payload
Payload Structure
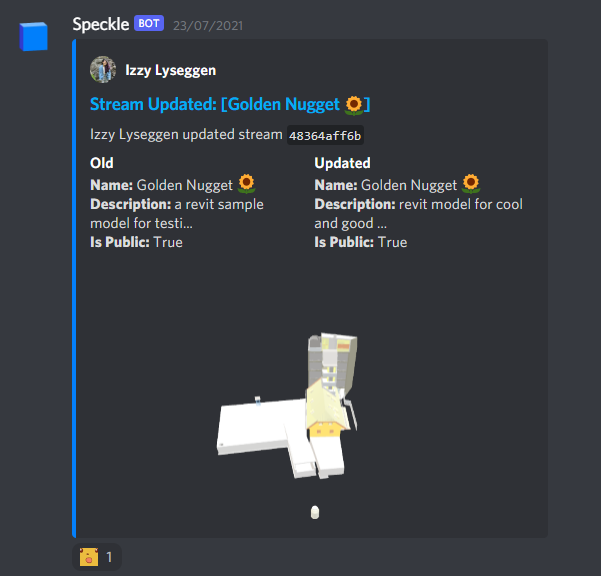
Let's have a look at what the requests from the Speckle Server look like. With your local server running, update your stream details (name, description, or is public) to trigger the webhook. You should then see something similar to the following printed in the console:
{
    "streamId": "48364aff6b",
    "userId": "1234abcdef",
    "activityMessage": "Stream metadata changed",
    "event": {
        "event_name": "stream_update",
        "data": {
            "old": {
                "id": "48364aff6b",
                "name": "Golden Nugget \ud83c\udf3b",
                "description": "revit model",
                "isPublic": false,
                "clonedFrom": null,
                "createdAt": "2021-06-29T09:09:02.993Z",
                "updatedAt": "2021-07-23T14:17:18.660Z"
            },
            "new": {
                "id": "48364aff6b",
                "name": "Golden Nugget \ud83c\udf3b",
                "description": "revit model for cool and
good times \ud83c\udf1e",
                "isPublic": true
            }
        }
    },
    "server": { ... },
    "stream": { ... },
    "user": { ... },
    "webhook": { ... }
}
There are a few key fields that will always be present in the payload including:
event: the event that triggered the request; it will always include theevent_nameanddata, though the structure of the eventdatawill vary depending on the event typeserver: details about the server that sent the request including itsname,description, andcanonicalUrlstream: details about the stream the event was triggered fromuser: details about the user who caused the event
Feel free to experiment and trigger the webhook with some of the other events to get familiar with the payload structure.
Discord Message Template & POST Request
Now that we've learned how the webhook payload is structured, let's have a go at extracting the information we're interested in and sending a message to our Discord channel.
Let's start small and only handle the stream_update event. This is the end result we're aiming for:
Our first step is to establish a basic message template that we can reuse whenever our webhook is triggered. Paste the following function into your run.py file. This function returns the template we'll be using for this example. The embed array contains the content of the message which we'll fill in using the received payload. Refer to the Discord API documentation on webhooks and embeds for more information on how to customise your messages.
def get_message_template():
    return {
        "username": "Speckle",
        "avatar_url": "https://avatars.githubusercontent.com/u/65039012?s=200&v=4",
        "embeds": [
            {
                "author": {
                    "name": "speckle user",
                    "url": "",
                    "icon_url": "https://avatars.githubusercontent.com/u/65039012?s=200&v=4",
                },
                "title": "",
                "url": "",
                "description": "",
                "color": 295163,
                "image": {"url": None},
            }
        ],
        "files": [],
    }
Let's also set up our function that will send our message (POST request) to Discord. We'll use requests for this, so go ahead and install it in your environment.
Since we may be uploading images along with our request, our request needs to be of type multipart/form-data. To achieve this, we'll add our message to an array along with any files we are attaching and send it using the files field in requests.post(). Add the following function to your run.py to handle this.
import requests

def send_to_discord(message: str):
	files = message.pop("files") # any images we're attaching (user avatar)
	# dump our message to the `payload_json` field
	files.append(("payload_json", (None, json.dumps(message))))
	res = requests.post(DISCORD_URL, files=files)
Extracting Payload Data
Now let's look at turning our webhook payload into a formatted message we can send to Discord.
Verifying The Request
First, let's add a function to our WebhookServer class that will verify the signature, check the event type, and pass on the payload. We know the overall payload structure will remain consistent, so we can reliably get the event type at payload["event"]["event_name"]. We can also make the payload a bit easier to handle by breaking it out into the different components: server, user, stream, webhook, and event.
# Web server:
class WebhookServer(object):

    @cherrypy.expose
    @cherrypy.tools.json_in()
    def webhook(self, *args, **kwargs):
        payload_json = cherrypy.request.json.get("payload", "{}")
        signature = cherrypy.request.headers["X-WEBHOOK-SIGNATURE"]
        self.webhook_called(payload_json, signature)

    # This function will be called each time the webhook endpoint is accessed
    def webhook_called(self, payload_json: str, signature: str):
		# verify the signature
        expected_signature = hmac.new(
            SECRET.encode(), payload_json.encode(), "sha256"
        ).hexdigest()
        if not hmac.compare_digest(expected_signature, signature):
            print("Ignoring request with invalid signature")
            return
        payload = json.loads(payload_json)
        print("Received webhook payload:\n" + json.dumps(payload, indent=4))

		# check the event and invoke the correct response
        event_name = payload.get("event", {}).get("event_name", "UNKNOWN")
        if event_name == "stream_update":
			on_stream_update(
				payload["server"],
				payload["user"],
				payload["stream"],
				payload["webhook"],
				payload["event"].get("data", {}),
			)
Populating The Message Template
Now let's write the on_stream_update function to be called in webhook_called. This will take in the payload data and format the Discord message. We'll use the get_message_template function we wrote earlier to get the base for the message then update it with the relevant info from the payload.
For instance, we'll make our message title pretty straightforward. We want it to say eg "Stream Updated: [Name of The Stream]" and make the title a clickable link to the stream. As you'd expect, you can get the stream name from the payload at stream_info['name'].
def on_stream_update(server_info, user_info, stream_info, webhook_info, event_info):
    msg = get_message_template()
    msg["embeds"][0].update(
        {
            "title": f"Stream Updated: [{stream_info['name']}]",
        }
    )
To construct the URL of the stream, we'll need the URL to the server server_info["canonicalUrl"]. This URL may or may not have a trailing slash, so we'll use rstrip("/") to get rid of that. We can then append /streams/{stream_info['id']} to get the link to the stream.
def on_stream_update(server_info, user_info, stream_info, webhook_info, event_info):
    server_url = server_info["canonicalUrl"].rstrip("/")
    msg = get_message_template()
    msg["embeds"][0].update(
        {
            "title": f"Stream Updated: [{stream_info['name']}]",
            "url": f"{server_url}/streams/{stream_info['id']}",
		}
    )
Another cool thing we can do is construct the URL for the preview image of the stream. You can get the preview of any stream by using the /preview endpoint followed by the stream id and optionally the commit id. For example, going to https://speckle.xyz/preview/3073b96e86/commits/8d15302d0b will give you this:
We already have the server URL, so adding the preview image is as simple as this:
def on_stream_update(server_info, user_info, stream_info, webhook_info, event_info):
    server_url = server_info["canonicalUrl"].rstrip("/")
    msg = get_message_template()
    msg["embeds"][0].update(
        {
            "title": f"Stream Updated: [{stream_info['name']}]",
            "url": f"{server_url}/streams/{stream_info['id']}",
			"image": {"url": f"{server_url}/preview/{stream_info['id']}"},
		}
    )
::: warning NOTE
Preview images will only work for public streams. If you want them to work for private streams, you'll need to make an authenticated request to the Speckle Server to get and download the preview image. You can then upload along with your request to Discord.
:::
You've got all the payload data available to you, so feel free to format the message however you want with whatever information you want! In this case, we went with a two column message that shows both the old stream details and the new stream details. At the end, we can call the send_to_discord function we wrote earlier to make the request to Discord. The full function to format the on_stream_update message is below:
def on_stream_update(
    server_info, user_info, stream_info, webhook_info, event_info
):
    server_url = server_info["canonicalUrl"].rstrip("/")
    msg = get_message_template()
    msg["embeds"][0].update(
        {
            "title": f"Stream Updated: [{stream_info['name']}]",
            "url": f"{server_url}/streams/{stream_info['id']}",
            "description": f"{user_info['name']} updated stream `{stream_info['id']}`",
            "fields": [
                {
                    "name": "Old",
                    "value": f"**Name:** {event_info['old']['name']}\n**Description:** {event_info['old']['description'] if len(event_info['old']['description']) < 30 else event_info['old']['description'][:30] + '...'}\n**Is Public:** {event_info['old']['isPublic']}",
                    "inline": True,
                },
                {
                    "name": "Updated",
                    "value": f"**Name:** {event_info['new']['name']}\n**Description:** {event_info['new']['description'] if len(event_info['new']['description']) < 30 else event_info['new']['description'][:30] + '...'}\n**Is Public:** {event_info['new']['isPublic']}",
                    "inline": True,
                },
            ],
            "image": {"url": f"{server_url}/preview/{stream_info['id']}"},
        }
    )
    add_author(msg, user_info, server_url) # * see next section for more info on this
    send_to_discord(msg)
Handling Avatar Images
You'll notice there's an extra function being called here: add_author. Adding the author's name is simple, but the avatar can get a bit tricky as it can either be a URL or a base64 string. You'll want to check the user_info["avatar"] to see if it exists and if it's a URL. If it is a URL, you can simply add it to the message author icon_url field. If it's a base64 string, you'll need to remove the prefix, decode the string, and add it as a file to be uploaded when you send your message. The following function will handle this for you along with filling in the author's name and linking to their profile:
import base64

def add_author(msg, user_info, server_url):
	avatar = user_info["avatar"] # get the user's avatar
	if avatar and not avatar.startswith("http"):
		type = avatar[5:].split(";")[0]
		filename = f"avatar.{type.split('/')[1]}"
		# decode and prepare it for being uploaded
		msg["files"].append(
			(
				"file",
				(
					filename,
					(base64.b64decode(avatar.split(",")[1])),
					type,
				),
			)
		)
		avatar = f"attachment://{filename}" # attachment syntax for files

	msg["embeds"][0]["author"].update(
		{
			"name": user_info["name"],
			"url": f"{server_url}/profile/{user_info['id']}",
			"icon_url": avatar,
		}
	)
Create A Discord Webhook URL
The last piece you need for this to work is your DISCORD_URL which is a URL created by Discord that lets you POST messages to a channel. Head to your server settings and select the "Integrations" tab.
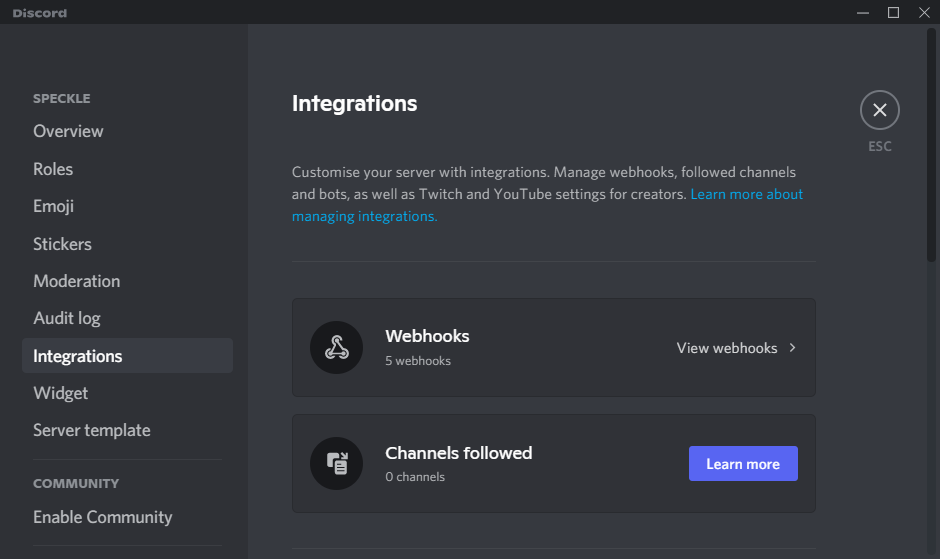
You'll see the "Webhooks" menu where you can create a new one, choose which channel it will post messages to, and copy its url. No need to worry about the name or avatar - these will be overridden by our bot in the message template we're using.
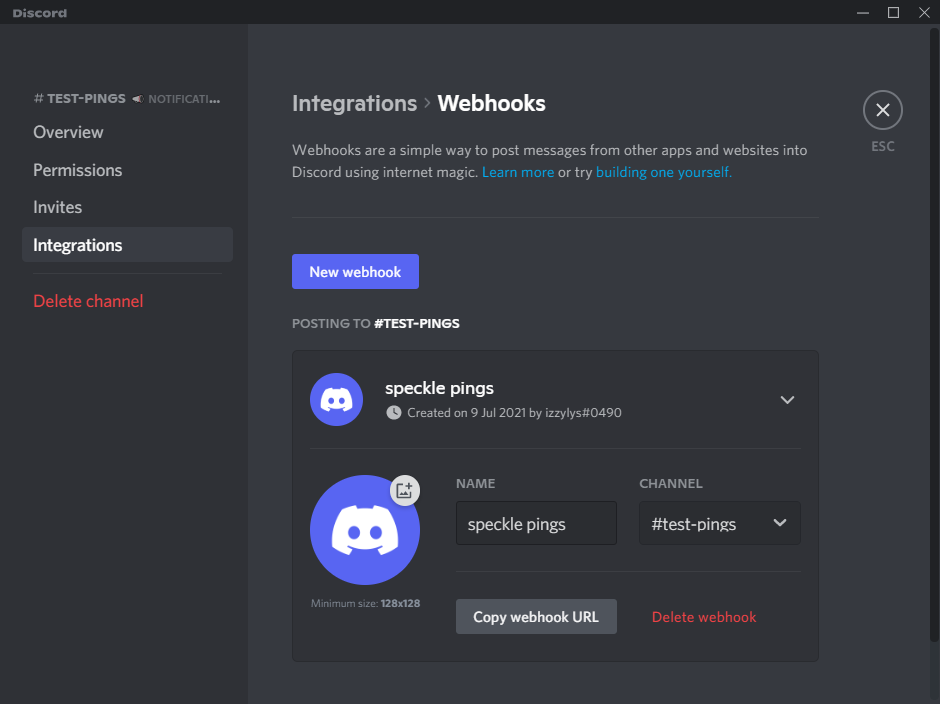
Use the "Copy webhook URL" button to get the URL and paste it into the DISCORD_URL variable at the top of your run.py.
Giving It a Spin
Congrats, you've got all the pieces in place! To recap, we've got
- a
WebhookServerthat will listen for webhook requests from your stream - a
webhook_calledfunction that will verify that the signature of incoming requests - a Discord message template
- an
on_stream_updatefunction which populates your Discord message template with data from your webhook payload - an
add_authorfunction which handles the author's info and avatar (whether it's a URL or a base64 image that needs to be decoded and attached) - a
send_to_discordmethod which puts together and sends aPOSTrequest to Discord to send your message
This is what your file should look like at this point:
import cherrypy
import requests
import base64
import json
import hmac


# It's not a good practice to hardcode the secret or the URL. It's best to get it from an environment variable.
# See the finished project for an example.
SECRET = "secret"
DISCORD_URL = ""


def get_message_template():
    return {
        "username": "Speckle",
        "avatar_url": "https://avatars.githubusercontent.com/u/65039012?s=200&v=4",
        "embeds": [
            {
                "author": {
                    "name": "speckle user",
                    "url": "",
                    "icon_url": "https://avatars.githubusercontent.com/u/65039012?s=200&v=4",
                },
                "title": "",
                "url": "",
                "description": "",
                "color": 295163,
                "image": {"url": None},
            }
        ],
        "files": [],
    }


def send_to_discord(message: str):
    files = message.pop("files")  # any images we're attaching (user avatar)
    # dump our message to the `payload_json` field
    files.append(("payload_json", (None, json.dumps(message))))
    res = requests.post(DISCORD_URL, files=files)


def add_author(msg, user_info, server_url):
    avatar = user_info["avatar"]  # get the user's avatar
    if avatar and not avatar.startswith("http"):
        type = avatar[5:].split(";")[0]
        filename = f"avatar.{type.split('/')[1]}"
        # decode and prepare it for being uploaded
        msg["files"].append(
            (
                "file",
                (
                    filename,
                    (base64.b64decode(avatar.split(",")[1])),
                    type,
                ),
            )
        )
        avatar = f"attachment://{filename}"  # attachment syntax for files

    msg["embeds"][0]["author"].update(
        {
            "name": user_info["name"],
            "url": f"{server_url}/profile/{user_info['id']}",
            "icon_url": avatar,
        }
    )


def on_stream_update(server_info, user_info, stream_info, webhook_info, event_info):
    server_url = server_info["canonicalUrl"].rstrip("/")
    msg = get_message_template()
    msg["embeds"][0].update(
        {
            "title": f"Stream Updated: [{stream_info['name']}]",
            "url": f"{server_url}/streams/{stream_info['id']}",
            "description": f"{user_info['name']} updated stream `{stream_info['id']}`",
            "fields": [
                {
                    "name": "Old",
                    "value": f"**Name:** {event_info['old']['name']}\n**Description:** {event_info['old']['description'] if len(event_info['old']['description']) < 30 else event_info['old']['description'][:30] + '...'}\n**Is Public:** {event_info['old']['isPublic']}",
                    "inline": True,
                },
                {
                    "name": "Updated",
                    "value": f"**Name:** {event_info['new']['name']}\n**Description:** {event_info['new']['description'] if len(event_info['new']['description']) < 30 else event_info['new']['description'][:30] + '...'}\n**Is Public:** {event_info['new']['isPublic']}",
                    "inline": True,
                },
            ],
            "image": {"url": f"{server_url}/preview/{stream_info['id']}"},
        }
    )
    add_author(msg, user_info, server_url)  # * see next section for more info on this
    send_to_discord(msg)


# Web server:
class WebhookServer(object):
    @cherrypy.expose
    @cherrypy.tools.json_in()
    def webhook(self, *args, **kwargs):
        payload_json = cherrypy.request.json.get("payload", "{}")
        signature = cherrypy.request.headers["X-WEBHOOK-SIGNATURE"]
        self.webhook_called(payload_json, signature)

    # This function will be called each time the webhook endpoint is accessed
    def webhook_called(self, payload_json: str, signature: str):
        # verify the signature
        expected_signature = hmac.new(
            SECRET.encode(), payload_json.encode(), "sha256"
        ).hexdigest()
        if not hmac.compare_digest(expected_signature, signature):
            print("Ignoring request with invalid signature")
            return
        payload = json.loads(payload_json)
        print("Received webhook payload:\n" + json.dumps(payload, indent=4))

        # check the event and invoke the correct response
        event_name = payload.get("event", {}).get("event_name", "UNKNOWN")
        if event_name == "stream_update":
            on_stream_update(
                payload["server"],
                payload["user"],
                payload["stream"],
                payload["webhook"],
                payload["event"].get("data", {}),
            )


cherrypy.config.update(
    {
        # TODO: uncomment the following line after finishing development
        # 'environment': 'production',
        "server.socket_host": "0.0.0.0",
        "server.socket_port": 8003,
    }
)

# start the server
cherrypy.quickstart(WebhookServer())
The last thing to do is give it a go! Start up your server by running your run.py, update your stream, and you should see a message like this appear in your Discord channel 🥳
Enhancements & Wrap Up
You've successfully created your first stream webhook integration! Now that you've got the basics in place, you can start implementing functions to handle the different event types and enhancing the project.
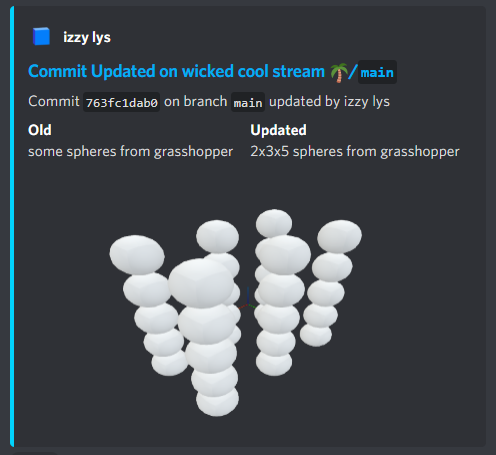
Have a look at the repo for a further developed project from what we started here. It has implemented handling of commit and branch events as well as space for you to implement the stream permissions events if you'd like. You'll also see how to:
- use the Speckle Python SDK
speckle-pyto get more information about new commits - move your secret and Discord URL to environment variables to avoid hard-coding them
- create a
DiscordBotclass that dynamically calls the required function depending on the webhook requestevent_name - break up your
run.pyinto smaller modules to separate yourWebhookServerand yourDiscordBotand make them more reusable
This was just one small example of what you can do with webhooks. The possibilities are endless! Anything that could be triggered by real-time updates of your Speckle data could be integrated with webhooks. We'd love to see what you come up with. Feel free to post about it on the forum or even hit us up on twitter. We also welcome any feedback, suggestions, or bug reports on the forum or on GitHub.
Conclusion
We hope you enjoyed this tutorial and found it useful!
Speckle is an Open Source project and we really ❤️ feedback, so if you have any questions, comments, critiques, or praises please let us know on our community forum.